








Dreamy Room Level 342 Walkthrough is available, and we’ve got the complete step-by-step solution to help you build that adorable floating circus!
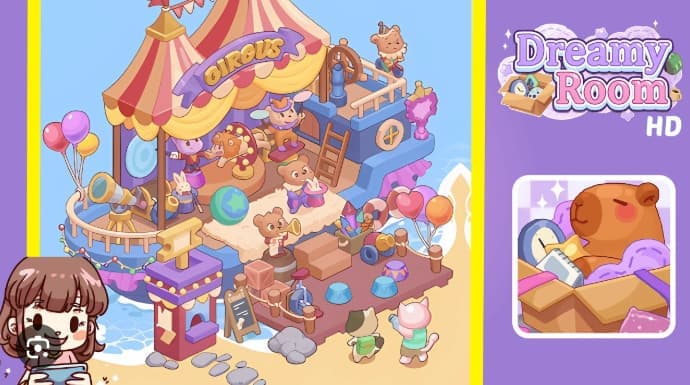
Level 342 challenges you to construct a whimsical circus boat docked at a sunny beach, complete with a striped tent, performing animals, and visiting spectators. If you’re struggling to figure out where the telescope goes, how to position the tent canopy, or why those balloon clusters won’t align properly, you’re not alone. This level demands precise placement and careful layering—one misaligned prop can throw off the entire scene.
Here’s what you’ll master in this Dreamy Room Level 342 Walkthrough:
- Tent Placement: How to anchor the large striped circus canopy so the “CIRCUS” banner sits perfectly centered
- Stage Setup: Correct positioning for the lion prop, rabbit ring-master, and juggling bear on the wooden platform
- Foredeck Details: Where to place the ticket booth, telescope, stepping stones, and festoon lights
- Backstage Area: Arranging barrels, crates, the steering wheel platform, and the ladder without clipping
- Finishing Touches: Balloon clusters, photographer cats on the beach, and hull decorations for that polished look
Dreamy Room Level 342 Walkthroughs & Guide
We know that Dreamy Room Level 342 can feel tricky at first glance, but once you grasp the core placement logic, the entire float circus scene comes together beautifully. The main challenge here revolves around spatial precision—every barrel, balloon, and banner must sit in its exact spot to match the target image. I’ve completed this level multiple times across both Android and iOS, and I can tell you that the secret lies in working methodically from large anchor pieces down to the tiniest decorative trim.
Start with the tent canopy. Position the big striped circus tent so its twin peaks rest over the center-left deck area. The tent’s front opening should face you directly; imagine you’re standing on the beach looking up at the float. The canopy features bold red, pink, and cream vertical stripes that arc naturally over a circular stage. Align the golden finials—those pointy ornaments on top—with the deck’s top rail. Let the curved yellow scalloped curtains cascade down to form a small awning; this shades the performers and creates depth. Now hang the purple “CIRCUS” banner centered above the curtain. The banner’s ends should tuck just under the tent’s ridge so it doesn’t float awkwardly in midair. Getting this canopy placement right early gives you clear boundaries for everything else in Dreamy Room Level 342.
Next, build the stage inside the tent. Place the round wooden stage disk directly beneath the tent opening. On the left side of the disk, set the lion prop facing slightly outward, as if it’s about to leap through a ring. Position the ring-master bunny or rabbit puppet to the rear-left, pointing toward the lion. Add the small drummer or juggling bear to the right side; these character pieces should face the audience. Lay the fluffy cream rug forward of center stage so performers step onto it. The rug should cover the front half of the tent floor and extend slightly toward the main deck. In Dreamy Room Level 342, subtle rotation of each character is critical—the rabbit’s ears and the bear’s hat must be readable from your viewing angle. Correct stage placement ensures the tent reads as an active circus scene rather than an empty shelter.
Move to the foredeck for entrance details. Place the small red ticket booth on the left front corner of the float’s lower platform. Set the sandwich-board ticket chalk sign just to the right of the booth, angled slightly toward the path stones. Add the old-fashioned brass telescope on a tripod to the left railing, pointing out over the water. The telescope’s base should sit on the deck planking but behind the short curved guardrail. Drape a short string of round festoon lights along the left railing and attach the colorful bulb garland to the booth corner so the lights sag slightly. These items mark the entrance area and guide the eye from the beach stones up to the float. Align the stepping stones on the sand to create a natural path leading to the ticket booth. This entrance setup in Dreamy Room Level 342 is your visual gateway—it tells visitors where to start their journey.
Now tackle the middle-to-rear deck. Arrange a cluster of barrels and wooden crates near the center-right to form a small supply staging area. Position a barrel with a bear playing a trumpet on the forward edge of this cluster, so the bear faces the audience and stands on a barrel or crate. Add boxes of colorful circus supplies—rocket-shaped toys and paint-topped cones—to the right side of the crate pile. Place the small ladder leaning against the raised rear platform and set the ship’s wooden steering wheel and its short railing on top of that raised rear platform; the wheel should be toward the aft starboard (right) corner. Attach the purple decorative mirror or ornate sign to the outer transom near the wheel. These placements give the float a functional back area for stagehands and add visual variety. Make certain the ladder aligns cleanly with the raised deck step to avoid clipping—tiny overlaps ruin the illusion.
Add the balloon clusters and photogenic props. Place one cluster of multi-colored round balloons attached to a short post on the left foredeck near the telescope. Place another mixed cluster of heart and round balloons on the right outer corner of the lower platform. Arrange the heart balloons so they sit visually near the toy cannon and small percussion drums on the right. On the lower right sand, place the two visiting characters—a cat with a camera and a cat with a backpack—facing the float and standing on the stepping stone path. The photographer cat should be slightly to the right with camera raised, and the backpack cat to the left, slightly behind. Scatter small toys—a large green-and-blue star ball, a pink magician’s top hat, a drum, and two little stage stools—across the lower platform near the rug so performers have props to interact with. These details animate the scene and simulate an arriving audience; precise placement makes the photo moments readable and lively.
Finish with hull trims and shoreline foam. Snap the purple ruffle trim along the hull under the deck edge so it peeks out around the bow and stern. Add the decorative panels and porthole cutout on the hull’s starboard side and place the lifebuoy or small figurehead near the rear guardrail. Lay the small wooden posts and rope barriers around the right-edge platform where the toys and drums sit. Ensure the shoreline foam, shallow water stones, and the beach sand align with the boat’s lower edge—the white foam should overlap the hull slightly to create a natural docked-on-beach look. Do a final layering pass: the tent should sit above the stage props; balloons must be in front of the rail but behind foreground characters; the photographer cat should be clearly in the foreground. Correct layering and tiny trims complete the polished look.
| Placement Zone | Key Items | Alignment Tip |
|---|---|---|
| Center-Left Deck | Striped tent, stage disk, performers, rug | Align finials with top rail; face tent opening toward viewer |
| Foredeck | Ticket booth, chalk sign, telescope, lights | Create path from beach stones to booth; drape lights naturally |
| Middle-Rear Deck | Barrels, crates, ladder, steering wheel | Cluster supplies center-right; align ladder with raised step |
| Lower Platform & Beach | Balloons, toys, visiting cats | Scatter props near rug; position cats on stepping stones |
| Hull & Shoreline | Ruffle trim, foam, porthole, lifebuoy | Overlap foam with hull; snap trim under deck edge |
Watch for clipping and misalignments. Objects like the ladder, crates, and rug should not intersect unnaturally with the deck rails. Tiny misalignments ruin the illusion—pay special attention to where the tent curtain meets the stage floor and where the barrel bases sit on the planks. If your placement tool has snapping or grid options, toggle them to help align finials, posts, and the “CIRCUS” banner accurately.
Colors and orientation matter: rotation and slight scale changes are part of the puzzle. Make sure the balloon clusters and heart balloons face the viewer properly so their strings and shadows fall in the correct direction.
How to Play Dreamy Room Level 342
Phase One: Establish the main tent structure. Drag the large striped circus tent canopy onto the center-left of the deck. Rotate it so the front opening faces you and the twin peaks sit evenly. The canopy’s red, pink, and cream stripes should arc naturally over the circular stage area. Align the golden finials with the deck’s top rail—this gives you a vertical reference point. Let the curved yellow scalloped curtains cascade down to form a small awning. Hang the purple “CIRCUS” banner centered above the curtain, tucking the banner’s ends just under the tent’s ridge. This tent is your visual anchor; everything else orbits around it.
Phase Two: Build the stage and add performers. Place the round wooden stage disk directly beneath the tent opening. On the left side of the disk, set the lion prop facing slightly outward. Position the ring-master bunny or rabbit puppet to the rear-left, pointing toward the lion. Add the small drummer or juggling bear to the right side; these character pieces should face the audience. Lay the fluffy cream rug forward of center stage so performers step onto it. The rug should cover the front half of the tent floor and extend slightly toward the main deck. Rotate each character subtly—the rabbit’s ears and the bear’s hat must be readable from your viewing angle. This phase transforms the tent from an empty shell into a lively circus scene.
Phase Three: Set up the entrance area. Move to the foredeck and place the small red ticket booth on the left front corner of the float’s lower platform. Set the sandwich-board ticket chalk sign just to the right of the booth, angled slightly toward the path stones. Add the old-fashioned brass telescope on a tripod to the left railing, pointing out over the water. The telescope’s base should sit on the deck planking but behind the short curved guardrail. Drape a short string of round festoon lights along the left railing and attach the colorful bulb garland to the booth corner so the lights sag slightly. Align the stepping stones on the sand to create a natural path leading to the ticket booth. This entrance setup guides the eye and establishes the float’s front.
Phase Four: Arrange the backstage area. On the middle-to-rear deck, arrange a cluster of barrels and wooden crates near the center-right to form a small supply staging area. Position a barrel with a bear playing a trumpet on the forward edge of this cluster, so the bear faces the audience. Add boxes of colorful circus supplies—rocket-shaped toys and paint-topped cones—to the right side of the crate pile. Place the small ladder leaning against the raised rear platform and set the ship’s wooden steering wheel and its short railing on top of that raised rear platform; the wheel should be toward the aft starboard (right) corner. Attach the purple decorative mirror or ornate sign to the outer transom near the wheel. Make certain the ladder aligns cleanly with the raised deck step to avoid clipping.
Phase Five: Add balloons, props, and visiting characters. Place one cluster of multi-colored round balloons attached to a short post on the left foredeck near the telescope. Place another mixed cluster of heart and round balloons on the right outer corner of the lower platform. Arrange the heart balloons so they sit visually near the toy cannon and small percussion drums on the right. On the lower right sand, place the two visiting characters—a cat with a camera and a cat with a backpack—facing the float and standing on the stepping stone path. The photographer cat should be slightly to the right with camera raised, and the backpack cat to the left, slightly behind. Scatter small toys—a large green-and-blue star ball, a pink magician’s top hat, a drum, and two little stage stools—across the lower platform near the rug. These details animate the scene and simulate an arriving audience.
Phase Six: Apply final touches and layering checks. Snap the purple ruffle trim along the hull under the deck edge so it peeks out around the bow and stern. Add the decorative panels and porthole cutout on the hull’s starboard side and place the lifebuoy or small figurehead near the rear guardrail. Lay the small wooden posts and rope barriers around the right-edge platform where the toys and drums sit. Ensure the shoreline foam, shallow water stones, and the beach sand align with the boat’s lower edge—the white foam should overlap the hull slightly to create a natural docked-on-beach look. Do a final layering pass: the tent should sit above the stage props; balloons must be in front of the rail but behind foreground characters; the photographer cat should be clearly in the foreground. Zoom out and view the whole float to spot any tiny overlaps or awkward gaps. The last 10% of polish is often what earns full completion credit.
Features of Dreamy Room Level 342
Dreamy Room Level 342 stands out because it combines multiple design challenges into a single cohesive scene. Let me walk you through the key features that make this level both fun and demanding.
Placement Precision is Critical
Correct placement of objects is the heart of this level. The game’s main challenge is determining the exact spot for each object so overlaps, shadows, and visual balance match the target art. When you place the tent, props, and characters, use small nudges rather than large moves to avoid misaligning other anchored items.
Tiny misalignments ruin the illusion—pay special attention to where the tent curtain meets the stage floor and where the barrel bases sit on the planks. If your placement tool has snapping or grid options, toggle them to help align finials, posts, and the “CIRCUS” banner accurately.
Step-by-Step Guided Structure
The walkthrough for Dreamy Room Level 342 breaks the level into six clear steps, each focusing on a specific zone of the float. This structure prevents overwhelm and ensures you don’t miss any items. Step one covers the tent and stage canopy. Step two handles the stage platform, performers, and rug. Step three sets up the foredeck entrance. Step four arranges the backstage area. Step five adds balloons, props, and visiting characters. Step six applies final touches and layering checks. By following this sequence, you build the scene logically and reduce the need for backtracking.
Visual Anchors Simplify Layout
Major structures like the ticket booth, the steering wheel on the raised rear platform, and the green star ball serve as alignment references. If you line objects up relative to these three landmarks, the rest snaps into place more naturally.
For example, once the ticket booth is positioned on the left front corner, you can measure distances for the chalk sign and telescope relative to it. The steering wheel on the rear platform anchors the right side, helping you place barrels and crates with confidence. The green star ball on the lower platform acts as a color landmark—use it to gauge spacing for nearby toys and drums.
Layering and Final Touches Matter
Layering is what separates a good attempt from a perfect completion. The tent should sit above the stage props; balloons must be in front of the rail but behind foreground characters; the photographer cat should be clearly in the foreground. Snap the purple ruffle trim along the hull under the deck edge so it peeks out around the bow and stern. Add the decorative panels and porthole cutout on the hull’s starboard side.
Lay the small wooden posts and rope barriers around the right-edge platform. Ensure the shoreline foam, shallow water stones, and the beach sand align with the boat’s lower edge—the white foam should overlap the hull slightly to create a natural docked-on-beach look. Do a final layering pass and zoom out to spot any tiny overlaps or awkward gaps.
Tips and Tricks from Experienced Players
- Work from big to small: Place the tent and major deck structures first, then add stage props, then characters, and finally small toys and lighting. This top-down approach reduces rework.
- Use reference landmarks: The ticket booth, steering wheel, and green star ball are excellent alignment anchors.
- Mirror placements mentally: Many items on the left have counterbalances on the right. When stuck, imagine folding the scene along the centerline and test symmetry.
- Speed trick: If the game lets you copy or duplicate items, duplicate balloon clusters and flip or nudge them into place rather than recreating from scratch.
- Final pass: Zoom out and view the whole float to spot any tiny
Similar Games
- Dreamy Room Level 182 Walkthrough
- Dreamy Room Level 164 Walkthrough
- Dreamy Room Level 312 Walkthrough
Final Words
Dreamy Room Level 342 challenges you to transform scattered props into a vibrant floating circus, and with the right approach, you’ll nail every placement detail. This level tests your spatial awareness and layering skills—from anchoring the striped tent canopy and positioning lively performers to arranging ticket booths, balloon clusters, and backstage supplies.
The key is working methodically: start with the tent structure, build the stage and entrance zones, then add backstage elements, balloons, and visiting characters before applying final hull trims and shoreline foam.
Use visual landmarks like the ticket booth, steering wheel, and green star ball to align objects accurately, and always check layering to ensure the tent sits above stage props while foreground characters pop clearly. Small nudges prevent clipping, and zooming out reveals any gaps or overlaps that need fixing. Whether you’re on Android or iOS, this six-phase strategy streamlines your workflow and cuts completion time.
By mastering these techniques, you’ll breeze through the circus float puzzle and confidently tackle the next creative challenge waiting in your Dreamy Room journey.


