








Dreamy Room Level 337 is one of the trickiest stages in the game, requiring precise placement of dozens of tiny items—from pastry displays to bistro tables—all while maintaining that signature pastel aesthetic.
Can you complete Dreamy Room Level 337 without a guide? Technically yes, but most players spend 30+ minutes repositioning furniture and décor. The level demands pixel-perfect alignment of counters, seating areas, and outdoor terrace elements that can frustrate even experienced players.
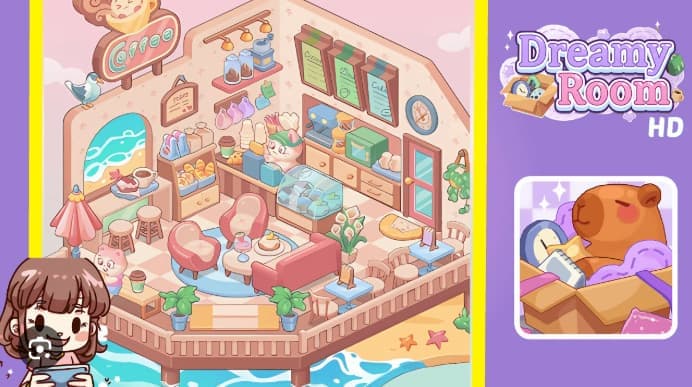
Dreamy Room Level 337 transforms your screen into a charming pier-side coffee shop, complete with a barista cat, umbrella seating, and turquoise ocean views. Unlike earlier levels, this stage introduces multi-layer placement challenges: you’ll build a working café counter with coffee machines and pastry cases, arrange intimate seating clusters on a checkered floor, and create an inviting outdoor terrace with palm trees and bistro tables. One wrong placement can throw off the entire visual balance.
What makes this Dreamy Room Level 337 walkthrough different?
- Step-by-step placement order that prevents blocking and overlap issues
- Exact positioning tips for the trickiest items (counter displays, hanging lights, terrace railings)
- Platform compatibility notes addressing Android/iOS level numbering differences
- Pro strategies from top players who’ve mastered the level’s symmetry requirements
- Visual checkpoints so you can verify progress at each stage
Dreamy Room Level 337 Walkthroughs & Guide
When you first open Dreamy Room Level 337 Walkthrough, you’ll see a charming seaside café waiting to be built. I always start by placing the tall back wall with its soft rose paper along the rear corner. This L-shaped wall forms two planes that meet at the center-back seam. Next, I position the wooden pier platform—it extends forward from the wall and rests on short round posts that dock into the cartoon ocean below. The platform gives Dreamy Room Level 337 Walkthrough its unique seaside vibe, so align it carefully. Finally, I lay the large pink-and-cream checker mattress flat on the platform. Make sure its angled front edge matches the platform’s beveled lip perfectly. In my experience, getting these three base pieces right sets you up for success in the rest of the level.
After the base is solid, I move to the left wall décor. Mount the oversized “Coffee” sign high on the left panel—its bottom should rest just under the top scallop edge. Below the sign, I install the arched window so you can see turquoise waves through it. This window is a key visual cue for Dreamy Room Level 337 Walkthrough and really brings the ocean theme to life. Leave a small gap between the sign and window; later you’ll perch a seagull prop on that ledge. I’ve found that placing these items first helps me visualize where the counter and seating will go. The sign slightly overhangs the wall edge, so don’t worry if it looks bold—that’s by design. Once the window is centered, you’ve nailed the left-side vignette.
Now it’s time to build the counter area in the back-right corner. I install the long service counter along the back wall, with cabinet drawers beneath and an angled display case on the right edge. On the counter, I place a coffee machine on the left, a grinder in the middle, and a small green bread oven on the right. The small display dome sits closest to the front center, facing the seating area. Above the counter, I mount three vertical menu boards on the right wall and hang a wooden rail with three small pendant lights centered over the workspace. These lights are signature décor for this level. I also add wall shelves above the counter and stock them with jars of beans, stacks of cups, and hanging mugs. In Dreamy Room Level 337 Walkthrough, these details echo the pastel palette and add depth, so take your time arranging them to match the reference image.
How to Play Dreamy Room Level 337
Playing this level is all about layering objects from back to front. I always start with the structural pieces—back wall, platform, and mattress—because they anchor everything else. Once those are in place, I work on the left wall by adding the “Coffee” sign and arched window. These two items define the café’s theme and give you a visual reference point. After the left wall is done, I shift focus to the counter area. Building the counter, stocking shelves, and hanging menu boards come next. This step involves a lot of small items, so I group similar objects together: all coffee gear goes on the counter, all jars and cups go on the shelves. Grouping saves time and keeps me organized.
Next, I position the pastry display at the front-right of the counter. Inside the glass dome, I arrange three or four colorful pastries facing the seating area. To the left of the display, I add bread baskets and packaged goods on low shelving along the back wall. I stack croissants and baguettes neatly and place small paper bags beside them. Near the left end of the counter, I include two small jars of toppings and a cake plate under the arched window. These placements form the visual trade area where the barista works. I’ve learned that keeping the display’s glass curve oriented toward the main seating makes the pastries visible to visitors approaching from the pier. This detail might seem minor, but it really enhances the café’s inviting feel.
After the counter is fully stocked, I place the barista character—a cute cat wearing a cap—behind the counter, slightly offset to the left of the pastry display. I add the cash register directly in front of the cat and place a small “Today” chalkboard sign on the back wall above the left shelving. I also arrange a couple of sticky-note menu cards to the right of the sign for extra detail. The barista should be visible from the main seating area, the register reachable from the front of the counter, and the noteboard readable. Getting these placements right simulates an intimate café atmosphere. I always double-check that the barista isn’t blocked by the pastry dome or any other prop.
Now I lay out the central seating area. I place the round blue rug centered before the counter. Then I arrange two bowl-shaped pink chairs diagonally on the rug’s left and front positions. Between the chairs, I set the small round coffee table and put a dessert plate and a drink on it. Behind the table, I add the short pink couch facing outward so patrons sit looking toward the pier. The sofa’s back should be parallel to the counter edge. This assembly becomes the room’s focal living cluster, so I keep spacing even and the rug centered. Balanced furniture lines make Dreamy Room Level 337 Walkthrough feel cohesive and polished. I’ve found that using the rug as an anchor point helps me center chairs and tables without guesswork.
Features of Dreamy Room Level 337
One standout feature of this level is its structural layering. You begin by placing a tall L-shaped back wall, a raised wooden pier platform, and a checkered mattress floor tile. These three pieces establish the room’s foundation and give you clear boundaries to work within. The back wall’s pale rose wallpaper and the platform’s round pilings create a seaside café aesthetic that feels both cozy and whimsical. I love how the checkered mattress adds a playful touch—it’s not a typical floor texture, and that makes the level memorable.
Another key feature is the prominent signage and window. The oversized “Coffee” sign and arched seaside window on the left wall instantly tell you this is a café. The window reveals turquoise waves beyond, connecting the interior to the ocean outside. This visual link is crucial for immersion. I’ve noticed that levels with strong thematic elements like this sign and window are more satisfying to complete because they feel like real spaces, not just random collections of furniture.
The service counter setup is another highlight. You install a long counter with cabinet drawers, an angled display case, and essential equipment like a coffee machine and grinder. Above the counter, you mount decorative menu boards and pendant lights. Wall shelves stocked with jars, cups, and mugs add visual interest and depth. This counter area is the heart of the café, and the level gives you plenty of small items to arrange. I appreciate the attention to detail here—every jar, cup, and menu board has a place, and finding that place is part of the puzzle.
Pastry displays and baked goods are featured prominently. You position a glass dome with colorful pastries, bread baskets, croissants, baguettes, and small jars of toppings. These items create a trade area that looks realistic and inviting. The level encourages you to think about how a real café would display its goods. I always orient the pastry dome toward the seating area so customers can see what’s on offer. This kind of thoughtful placement makes the scene feel alive.
The barista character and interactive elements add personality. You place a cute cat barista behind the counter with a cash register and a “Today” chalkboard sign. Sticky-note menu cards and a noteboard enhance the café atmosphere. These elements turn the level from a static diorama into a dynamic space where you can imagine customers ordering drinks and pastries. I find that levels with characters and interactive props are more engaging because they tell a story.
Central seating arrangements are designed for social interaction. You lay out a circular rug, chairs, a coffee table, and a sofa. This cluster becomes the room’s focal point, where patrons gather to chat and enjoy their treats. The level emphasizes balance and symmetry—spacing must be even, and the rug must be centered. I’ve learned that using the rug as a guide helps me achieve that balance without constant adjustments.
The outdoor terrace elements connect the interior to the seaside. You build a wooden railing, add an umbrella bench, and place a customer holding a donut. Potted palms at the central entrance steps and a sandy beach patch with starfish complete the outdoor scene. This indoor-outdoor flow is a standout feature. It makes the café feel like part of a larger world, not just a single room. I always make sure the umbrella base anchors to the railing corner and the bench faces inward slightly.
Bistro tables and hanging plants create a cozy outdoor dining strip. You set three small bistro tables with two wooden chairs each along the right railing, spacing them evenly. Each table gets a little menu card stand. Near the back-right wall, you add a tall hanging plant beside the pink door. These elements give the terrace a lived-in feel. I’ve found that consistent spacing between tables is key—if one table is too close or too far, the whole strip looks off.
Small décor items increase realism and charm. You scatter bar stools, a cake plate, a wall clock, starfish, and takeaway boxes throughout the scene. These micro-placements dramatically enhance the level’s authenticity. I always zoom in for close-up adjustments in clustered areas like the pastry display and register. A few pixels can make the difference between a scene that looks good and one that looks perfect.
Finally, the level emphasizes color balance and soft pastels. Dreamy Room Level 337 uses pinks and aqua tones to create a soothing, whimsical vibe. If your editor lets you tweak hues, aim for soft saturation to match the finished image. I’ve noticed that maintaining this color palette ties all the disparate elements together. The pastel shading and careful placement of accents harmonize the layout and make the scene feel cohesive.
Tips and Tricks for Level 337
Placement precision is your top priority. I always use grid or snap aids to align objects neatly. Even a few pixels of misalignment on the counter or rug can make the scene look off-model. The game often provides invisible guides—pay attention to them. If an object snaps into place, that’s usually the correct position. I’ve wasted time trying to force placements that didn’t align with the grid, so trust the snap aids when they’re available.
Build from back to front to avoid blocking placements. I start with back-wall items like the sign, window, and menus before moving to counters and seating. This approach prevents me from accidentally covering up spots where smaller items need to go. If you place the sofa first, for example, you might struggle to fit the rug underneath it later. Working back to front keeps your workflow smooth and logical.
Test for collision boxes on larger props. Items like the umbrella and sign may have invisible bounds that extend beyond their visible edges. If the game rejects a placement, nudge the item slightly to find the sweet spot. I’ve learned to move large props in small increments rather than dragging them wildly. Patience pays off here—one or two careful nudges often solve the problem.
Save checkpoints frequently so you can revert a single object instead of rebuilding the whole layout. I hit save after completing each major step: base structure, left wall, counter, seating, terrace. If I mess up a placement, I can reload the last checkpoint and fix just that one item. This habit has saved me hours of frustration. Don’t rely on the game’s auto-save—manual saves give you more control.
Maintain color balance by using soft pastel hues. If your editor allows color tweaks, aim for pinks and aqua tones with low saturation. I’ve found that overly bright colors clash with the level’s aesthetic. Stick to the pastel palette shown in the reference image. If you’re unsure, compare your scene to the finished image frequently. Adjust hues until they match.
Use anchor points to guide your placements. I place the rug first and use it as a visual reference for centering chairs and tables. Top players always anchor major furniture to a central rug or mat to preserve symmetry. Once the rug is down, I can eyeball distances more easily. This trick works for any level with a central seating area.
Duplicate and mirror objects when possible. If the editor allows duplication, create one bistro table and duplicate it for the right terrace. Align duplicates with consistent spacing to speed up placement. I’ve used this technique on many levels—it’s a huge time-saver. Just make sure each duplicate is rotated or positioned correctly so the scene doesn’t look too repetitive.
Layer order management prevents accidental overlaps. I bring forward seating and move back wall décor so nothing clips through anything else. Once I’m satisfied with a layer, I lock it to prevent accidental moves. This is especially important in crowded areas like the counter, where many small items cluster. Locking layers keeps my workspace tidy.
Micro-adjust with keyboard nudges for pixel-perfect placement. I use arrow keys to move items one or two pixels at a time. This level of precision is crucial for small items like the pastry display and register. Mouse dragging is too coarse for fine adjustments. Keyboard nudges give me the control I need to match the reference image exactly.
Zoom in for close-up adjustments in clustered areas. I always zoom in on the pastry display, register, and counter shelves. At normal zoom, it’s hard to see if items are aligned properly. Close-up views reveal misalignments that I’d otherwise miss. I zoom out periodically to check the overall composition, but most of my detail work happens zoomed in.
Similar Games
Final Words
Dreamy Room Level 337 challenges you to construct a charming pier-side coffee shop through careful placement of dozens of intricate elements—from pastry displays to bistro seating. This guide has walked you through every critical step: anchoring your foundation with the L-shaped wall and checkered platform, mounting the signature “Coffee” sign and ocean-view window, assembling a fully-stocked counter with equipment and shelving, arranging intimate seating clusters around a centered rug, and building an inviting outdoor terrace complete with umbrella seating and palm accents.
Work back-to-front to prevent blocking issues, use snap aids for pixel-perfect alignment, save checkpoints after each major section, and maintain the soft pastel palette that gives this level its dreamy aesthetic.
Master these techniques—especially micro-adjustments with keyboard nudges and collision-box awareness for large props—and you’ll breeze through the trickiest placements. With your barista cat stationed behind the counter and customers enjoying treats on the terrace, you’ve transformed a blank canvas into a bustling seaside retreat.


