








Dreamy Room Level 338 has tripped up thousands of players with its intricate layout of dinosaur skeletons, amphora vases, and multi-tiered platforms that demand pixel-perfect placement.
Dreamy Room Level 338 Walkthrough guides are scattered across the internet, but most miss the critical details that separate a frustrating hour of trial-and-error from a satisfying five-minute solve. This level transforms you into a museum curator, tasking you with arranging a sophisticated exhibition space complete with fossil displays, framed artwork, rope barriers, and visitor cats who actually need room to move.
Here’s what makes this level tricky:
- Platform confusion – The two-tiered floor system catches many players off guard; place it wrong and your entire carpet path misaligns
- Central divider placement – One pixel off and your amphora vases won’t sit symmetrically
- Dinosaur skeleton scale – This showpiece must fit the raised platform without clipping into walls or visitor paths
- Lighting balance – Wall sconces need strategic placement or your gallery looks lopsided
The good news? Once you understand the six-step sequence—starting with corner pillars and ending with character placement—Dreamy Room Level 338 becomes one of the most satisfying builds in the 330-340 range. The key is working in layers: structure first, then focal points, then decorative details.
Ready to turn that jumbled pile of museum artifacts into a polished gallery that would make any curator proud? Let’s walk through exactly where every single piece belongs, including those sneaky wall shelves and plaque stands that always seem to have one perfect spot.
Dreamy Room Level 338 Walkthroughs & Guide
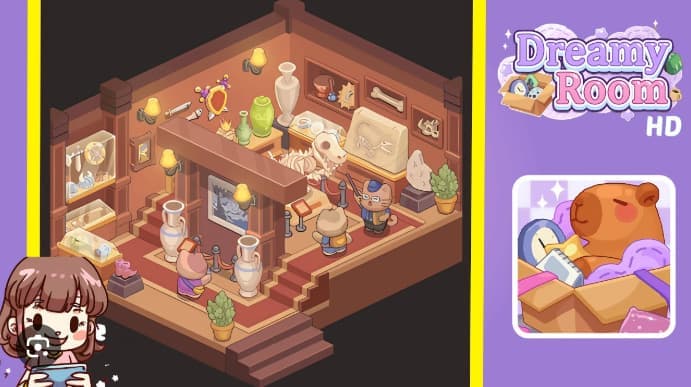
Dreamy Room Level 338 asks you to build a gallery space from the ground up — placing pillars, platforms, artifacts, and even a dinosaur skeleton. The key challenge here is precision: every vase, every rope barrier, every wall light must sit exactly right or the whole composition falls apart. I’ve completed this level multiple times, and I can tell you that rushing through placements is the fastest way to restart from scratch.
Start by laying down the room’s skeleton — the two-tiered floor platform and four tall corner pillars. The lower platform goes front-left; the raised section sits back-right against the wall. These two levels create the “step-up” effect that guides visitors through your gallery. Next, snap those four pillars into the corners: two along the left wall, two along the right. They’re chunky, stacked-block columns that give the room vertical strength. Make sure the front edge of the lower platform lines up cleanly so your red carpet and stairs will fit without gaps.
Now add the central stairs at the front, facing you. Lay the red carpet runner from the base of those stairs all the way to the back, crossing both platform tiers. The carpet edges should run parallel to the platform edges — any crooked angle breaks the symmetry. Then position the short divider wall across the middle of the room, perpendicular to the back wall. This divider splits your gallery into left and right bays and will hold the framed painting plus two large white vases at its base. Leave narrow walkways on each side so your visitor characters can move freely.
Place those twin white amphora vases in front of the divider, one left and one right, flanking the central painting. Attach the framed artwork to the divider’s center, slightly recessed. Add short rope stanchions between the vases to form a protective barrier in front of the painting. This triad — vase, painting, vase — becomes the focal point of Dreamy Room Level 338 and must be balanced perfectly. A small plaque stand goes just to the side of the rope so visitors can “read” about the exhibit.
On the left gallery bay, mount a tall glass display case on the back-left wall showing jewelry and small blades. Below that, place a lower floor case near the front-left with a dish and relics. Add a pedestal in the lower-left corner holding pink boots or a similar trinket, and set a potted plant at the front-left ledge. Attach two wall sconces to the back-left wall — one above the glass case, one near the middle — so the left exhibits glow softly. This side is dense with small artifacts; arrange them so visitors can pause and inspect each case as they walk the carpeted path.
The right gallery is the dramatic side. Place a cluster of ceramic vases and green urns on the back-right table area. Position the large dinosaur skeleton centrally on the raised back-right platform, its ribcage and skull angled slightly toward the room’s center. To the skeleton’s right, set the carved fossil slab — a rectangular stone with a dinosaur imprint — on a pedestal against the back wall. Above and around the slab, add recessed wall shelves holding a bone, small skull, and bowl. Ensure the skeleton’s scale fits the raised platform and that rope posts separate it from the visitor path. These placements define the right-side narrative in Dreamy Room Level 338 and demand careful spacing.
Finally, place your three cat characters: one visitor kneels near the front amphora vases reading a plaque, another stands near the skeleton, and the curator cat with a pointer stands to the right of the dinosaur to “explain” the exhibit. Add plaque stands in front of the painting and near the skeleton. Place a medium potted cactus at the front-right corner and another pot at the front-left for symmetry. Install the remaining wall sconces across the back wall and attach a narrow shelf on the divider’s top for tiny artifacts like a crown or small vase. These finishing touches complete the museum narrative and create natural stopping points for visitor interaction.
How to Play Dreamy Room Level 338
Playing Dreamy Room Level 338 is all about methodical construction. You’re not just dropping items randomly — you’re curating a museum exhibit that must look professional and feel inviting. I recommend working in layers: foundation first, then structure, then decoration. This approach prevents visual clipping and keeps your workspace organized.
Step one: Build the foundation. Place the two-tiered platform so the lower section covers the front-left area and the raised section sits back-right. Snap the four corner pillars into position — two left, two right. These pillars are your vertical anchors and will support wall trim and sconces later. Make sure the front edge of the lower platform is flush so stairs and carpet align cleanly.
Step two: Add the central stairs at the front, facing forward. Lay the red carpet runner from the base of the stairs across both platform tiers, ensuring the edges run parallel to the platform edges. Position the short divider wall across the middle of the room, perpendicular to the back wall. This divider creates two gallery bays and will hold the framed painting and two large vases. Leave narrow walkways on each side for visitor movement.
Step three: Place the twin white amphora vases in front of the divider, one left and one right. Attach the framed painting to the divider’s center, slightly recessed. Add short rope stanchions between the vases to form a protective barrier. Position a small plaque stand just to the side of the rope. This central triad is the focal point of your gallery and must be balanced perfectly.
Step four: Populate the left gallery. Mount a tall glass display case on the back-left wall showing jewelry and small blades. Place a lower floor case near the front-left with a dish and relics. Add a pedestal in the lower-left corner holding pink boots, and set a potted plant at the front-left ledge. Attach two wall sconces to the back-left wall for soft lighting. This side is dense with small artifacts; arrange them so visitors can inspect each case in order.
Step five: Fill the right gallery. Place ceramic vases and green urns on the back-right table. Position the large dinosaur skeleton centrally on the raised back-right platform, angled slightly toward the room’s center. Set the carved fossil slab on a pedestal to the skeleton’s right. Add recessed wall shelves above the slab holding a bone, small skull, and bowl. Ensure rope posts separate the skeleton from the visitor path.
Step six: Add your three cat characters, plaque stands, potted plants, and remaining wall sconces. One visitor kneels near the front vases, another stands near the skeleton, and the curator cat with a pointer stands to the right of the dinosaur. Place a medium potted cactus at the front-right corner and another pot at the front-left for symmetry. Install wall sconces across the back wall and attach a narrow shelf on the divider’s top for tiny artifacts. These finishing touches complete the museum narrative.
Features of Dreamy Room Level 338
Dreamy Room Level 338 stands out for its emphasis on accurate placement. Unlike earlier levels where you can eyeball positions, this stage demands precision. Small offsets break the composition or block walkways, forcing you to restart. I’ve learned that using the grid snap feature saves hours of frustration.
The step-by-step construction approach is another key feature. You start with foundational elements like pillars and platforms, then add structural pieces like the divider wall and stairs, and finally layer in decorative items. This sequence prevents visual clipping and ensures each item has its proper place. If you try to add decorations before the structure is solid, you’ll end up moving things multiple times.
The central gallery focus is the heart of the level. The divider wall and the arrangement of amphora vases plus the framed painting create a focal point that draws the eye. This triad must be balanced perfectly — if one vase is even slightly off-center, the whole composition feels lopsided. I recommend placing the divider first, then measuring equal distances for the vases.
Left and right gallery details enhance thematic storytelling. The left side is dense with small artifacts in glass cases, creating a jewelry and trinket narrative. The right side is dramatic, dominated by the dinosaur skeleton and fossil slab. This contrast — delicate versus massive — makes the level visually interesting and gives visitors two distinct experiences.
Visitor interaction is built into the design. The three cat characters aren’t just decorations; they’re placed to create a lively museum atmosphere. One visitor reads a plaque, another examines the skeleton, and the curator explains the exhibit. These placements encourage you to think about how real visitors would move through the space.
Lighting and aesthetics matter more in this level than in most others. Wall sconces must be balanced left and right to prevent shadow bias. The level rewards subtle adjustments — nudging an item a few pixels can make the difference between a professional-looking gallery and a cluttered mess. I’ve spent entire sessions just tweaking sconce positions to get the lighting right.
Tips from top players include using grid snap for quick alignment, placing large anchor objects first, and making micro-adjustments instead of big moves. These strategies come from players who’ve completed the level in under ten minutes. The grid snap feature is especially useful for aligning vases, stanchions, and painting centers quickly.
Tips and Tricks for Dreamy Room Level 338
Precision placement is the number-one tip for Dreamy Room Level 338. Small misalignments disrupt the overall design and block pathways. I use the grid snap feature whenever possible to lock items into place. If your platform doesn’t have grid snap, zoom in and nudge items pixel by pixel until they’re perfect.
Layer order saves time and prevents visual clipping. Place floor and platform pieces first, then pillars and the divider wall, then carpeting. Add decorative items last so nothing overlaps awkwardly. I learned this the hard way after placing vases before the divider and having to move them three times.
Collision awareness is critical when placing large items like the dinosaur skeleton and amphora vases. Ensure they don’t overlap with walkways or stanchions. If a visitor character can’t move freely, you’ve placed something wrong. Test visitor paths by imagining a line from the front stairs to each exhibit — nothing should block that line.
Balanced lighting prevents uneven shadows. Distribute wall sconces evenly left and right. I place one sconce above each major exhibit and one near the middle of each wall. This creates a soft, even glow that highlights artifacts without casting harsh shadows.
Incremental progress means saving your work frequently. Add a group of items, save, then add the next group. This prevents losing progress if you need to restart. I save after placing the foundation, after adding the divider and vases, and after populating each gallery.
Grid snap utilization is a game-changer. Top players rely on snapping for symmetry. If your platform supports it, enable grid snap before placing vases, stanchions, and the painting. This locks items into aligned positions instantly, saving you from manual adjustments.
Anchor first means placing large focal pieces — pillars, divider, skeleton — before surrounding them with smaller items. This creates a stable layout and makes it easier to frame large objects with decorations. I always place the skeleton first, then add shelves and vases around it.
Micro-adjustments are better than big moves. If an item looks off, nudge it a few pixels rather than dragging it across the room. The level’s aesthetic is subtle and benefits from small tweaks. I’ve spent five minutes nudging a vase left and right until it felt perfectly centered.
Similar Games
- Dreamy Room Level 182 Walkthrough
- Dreamy Room Level 126 Walkthrough
- Dreamy Room Level 169 Walkthrough
Final Words
Dreamy Room Level 338 transforms you from frustrated player into confident curator once you master its layered construction approach. The secret lies in treating each placement as part of a living museum narrative—those amphora vases aren’t just decorative props, they’re storytelling anchors that frame your central painting. The dinosaur skeleton demands respect for spatial boundaries, while those wall sconces require an artist’s eye for symmetry.
Success hinges on three pillars: foundation-first thinking, grid-snap precision, and patience with micro-adjustments. Players who rush through placements find themselves restarting repeatedly, while those who build methodically—platforms before pillars, structure before decoration—complete the level with a sense of genuine accomplishment. The two-tiered gallery design rewards careful planning over speed.
What makes this level memorable isn’t just its complexity but its payoff. That final scene—warm terracotta walls, visitor cats pausing at exhibits, balanced lighting casting soft shadows—feels earned. You’ve built something that breathes life into digital space. The rope barriers protect artifacts, the plaque stands invite curiosity, and every vase sits exactly where a real curator would place it.


