
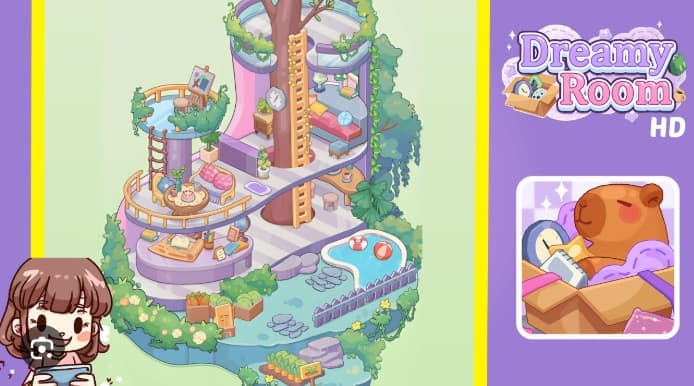









Dreamy Room Level 341 Walkthrough is available right here. This level features a stunning multi-tiered treehouse design with a central trunk, ladder system, bedroom platform, rooftop garden, social seating area, study desk, pool terrace, and vegetable garden—all requiring precise placement to achieve the perfect cozy micro-world aesthetic.
Level 341 marks a significant milestone in your Dreamy Room journey. You’ve progressed through hundreds of increasingly complex designs, and now you’re facing one of the most intricate vertical compositions in the game. This level tests your spatial awareness, layering skills, and attention to detail like never before. The central tree trunk serves as your structural backbone, with platforms spiraling around it at three distinct heights, each demanding careful furniture arrangement and decorative balance.
What makes this level special:
- Vertical complexity – Three distinct tiers (bedroom, social area, garden/pool) require precise z-order placement
- Anchor system – The tree trunk and ladder dictate every other element’s position
- Platform numbering issues – Android and iOS versions may differ; always reference images/video first
- Dense decoration – Over 50 individual items must be positioned without crowding walkways
- Natural aesthetics – Vines, plants, and lighting must create organic flow between hard-edged platforms
Whether you’re a completionist aiming for 100% or simply stuck on where that easel belongs, this guide walks you through every placement step. Level 341 rewards patience and systematic building—start with the trunk, work top-down through platforms, and finish with those tiny details that bring the scene to life.
Dreamy Room Level 341 Walkthroughs & Guide
Start with the tree trunk and ladder in the exact center of your space. This trunk acts as your main anchor for Dreamy Room Level 341 Walkthrough. I always place this piece first because every other platform, railing, and vine will line up based on where this trunk sits. Position the tall wooden ladder against the front face so its rungs run straight from the bottom deck all the way to the top platform. Make sure the ladder sits slightly forward so your game character can climb it without clipping through other objects. Loop your string lights down one side of the ladder so they wrap around the rungs naturally; this creates a warm, inviting glow that guides the eye upward. Next to the trunk’s lower-right side, add the small hexagon wall clock and the little nightstand that holds a potted succulent. These tiny details ground the trunk and make it feel like part of a lived-in space rather than just a structural pole. In Dreamy Room Level 341 Walkthrough, this central axis is critical — if you place the trunk off-center, all your platforms will look tilted or disconnected when you add them later.
Move to the top-right circular platform and build the bedroom area. Place the low bed frame against the inner curved wall, then layer the pink mattress, a square yellow pillow, and a round blue cushion on top. I like to offset the pillows slightly so they don’t look too perfect; a little asymmetry makes the bed feel cozy and real. At the foot of the bed, add the small ottoman or footstool, and position the bedside nightstand with its lamp and stacked books right next to the headboard. The lamp should face inward so its light pool falls on the bed rather than spilling off the edge. Wrap a short curved railing around the outer rim of this platform, and drape a lush trailing vine along the railing’s edge so it cascades downward. This bedroom must align with the trunk so the ladder appears to reach this level — check the z-order and make sure the ladder’s top rungs overlap the platform’s base. Dreamy Room Level 341 Walkthrough rewards careful alignment here; if the bedroom floats too high or sits too low, the whole vertical flow breaks and the scene looks disjointed.
On the top-left platform, create a rooftop garden and art studio corner. Place the timber easel and a small artist’s stool toward the inner edge of the circle, angling the easel so it faces outward as if the painter is enjoying the view. Put the painter’s palette and a small canvas with bright color splotches on the easel; these details add personality and suggest someone just stepped away from their work. Surround the easel with dense tufts of greenery — low planters, ferns, and flowering shrubs work well — and add a tiny round plant pot on the floor next to the stool. Keep the railing low and visible so it separates this garden from the main walkway without blocking the view. In Dreamy Room Level 341 Walkthrough, this area should feel open and airy; position foliage so it overhangs slightly but doesn’t crowd the easel. I often nudge the plants inward by a few pixels to create realistic layering without making the platform look cluttered.
Now set up the middle-tier social area on the curved walkway around the tree. Place the small loveseat or sofa with the pink-check throw cushion facing toward the central table. Position the round wooden table slightly offset in front of the sofa — not dead center, but a bit to one side — and load it with a birthday cake, two cups, and a small teapot. Add the low railing along the outer edge of the walkway and lay a rectangular lilac rug near the sofa’s feet to define the seating zone. Close to the railing, place a potted floor plant for depth; this plant helps frame the social area and prevents the walkway from feeling empty. Make sure the sofa faces the cake table and that the rug aligns with any stripes or texture lines on the walkway floor. This middle tier anchors the entire composition — it’s where the eye naturally lands after following the ladder upward, so getting the furniture angles right is key. I always check that the cake sits level on the table and the cups don’t float; small errors here stand out because this area gets the most visual attention.
Drop down to the lower-left oval platform and arrange the study desk. Place the desk with the open book, rolled blueprint, pencil cup, and tiny globe front and center. Arrange the book open in the middle, sticky notes near one corner, a stack of notebooks to the left, and the pencil holder to the right. Put the little chair or stool in front of the desk so it looks ready for someone to sit down and start working. Close by, add the small round mirror and a framed photo propped at an angle against the wall or desk edge. In Dreamy Room Level 341 Walkthrough, this study area should feel used and a bit cluttered — scatter the papers slightly, angle the globe so it’s not perfectly straight, and make sure the notebooks lean rather than sit flat. These tiny offsets create a sense of activity and prevent the desk from looking like a static display. This placement helps the eye move naturally from the social middle tier down to the work area, creating a visual flow that guides players through the scene.
On the far-right lower terrace, build the pool and outdoor lounge. Place the kidney-shaped pool in the center of this terrace and float two inflatable toys — a striped beach ball and a lifebuoy — in the water. Arrange the curved wooden fence with short posts along the pool’s right margin to define the boundary, and lay flat stepping stones from the main path to the pool entrance so characters have a clear route. Between the pool and the main walkway, add a broad-leaf tropical potted plant and a small tea table with a cup and stool tucked beneath it. The pool area gives the scene outdoor balance and a resort vibe; spacing the stones and fence correctly creates a natural walkway and ensures the pool’s edge meshes with the terrace elevation. I always check that the floaties sit in the water rather than hovering above it, and I nudge the fence posts so they follow the curve of the pool’s edge. This attention to spacing makes the pool feel integrated rather than dropped in as an afterthought.
On the front lower ledge, create the vegetable garden display. Place the wooden garden crates in a row: one filled with bright orange carrots, one with heads of green cabbage, and a small seedling row with a wooden sign showing a sprout icon. Arrange a short display board in front of the crates and scatter a few ornamental bushes and flowering vines along the front rim of the terrace. Add a small stone and a tiny rock outcropping near the garden’s right side to break up the straight line of crates. The garden provides foreground interest and gives the scene a homey, productive feel; position the crates so they sit flush with the terrace edge and angle the sign slightly toward the viewer to make it feel inviting. I like to offset the crates by a few pixels so they don’t look too uniform — real gardens are never perfectly aligned, and that slight irregularity makes the scene more believable.
Finish by adding trailing vines, small potted plants, and final accessories. Drape long hanging vines down the right exterior wall so they cascade from the top platform to the lower terrace, and wrap short garlands around the rims of the top platforms. Add small potted plants on ledges, a floor cushion ottoman near the sofa, the tiny rug by the middle walkway, a coffee mug on the side table, and the small stool near the ladder base. Place a framed picture leaning against the lower desk edge and tuck in any remaining books, a globe, and the small cake box on the social table. In Dreamy Room Level 341 Walkthrough, detail placement matters — tiny offsets like a cup tilted at an angle or a pillow slightly askew make the room feel lived-in and coherent with the trunk, ladder, and platform geometry you established earlier. I always do a final pass to check that every object casts a shadow in the right direction and that no items float or clip through surfaces. These micro-adjustments take only a few seconds but they elevate the scene from good to great.
How to Play Dreamy Room Level 341
Begin by placing your central tree trunk and ladder as the first action. This trunk is the backbone of the entire level, and every other piece will reference its position. I always start here because if the trunk is off-center, the whole layout feels unbalanced. Attach the ladder to the front face of the trunk so its rungs line up straight from the bottom to the top platform. Loop string lights down the ladder’s side so they wrap the rungs and create a warm glow. Next to the trunk’s lower-right side, add the hexagon wall clock and the nightstand with a succulent. This step sets the vertical axis for the level, and getting it right makes all subsequent placements easier. If you skip this step or rush it, you’ll spend extra time later trying to realign platforms and railings.
Next, position the upper bedroom platform with all its furniture on the top-right. Place the low bed against the inner curved wall, layer the pink mattress, yellow pillow, and blue cushion on top, and add the ottoman at the foot of the bed. Position the bedside nightstand with its lamp and books right next to the headboard, and wrap a short curved railing around the outer edge. Drape a lush trailing vine along the railing so it cascades downward. This bedroom must align with the trunk so the ladder appears to reach this level — check the overlap and make sure the ladder’s top rungs touch the platform’s base. I always zoom in to verify the alignment before moving on, because fixing it later means shifting multiple objects.
Move to the top-left platform and set up the rooftop garden with an easel and stool. Place the timber easel and artist’s stool toward the inner edge, angling the easel so it faces outward. Put the painter’s palette and a small canvas on the easel, and surround the area with dense greenery — low planters, ferns, and flowering shrubs. Add a tiny round plant pot on the floor next to the stool, and keep the railing low and visible. This garden should feel open and breezy; position foliage so it overhangs slightly but doesn’t crowd the easel. I often nudge plants inward by a few pixels to create realistic layering without clutter.
On the middle-tier walkway, arrange the social area with a sofa, table, and cake. Place the small loveseat with the pink-check cushion facing the central table, position the round wooden table slightly offset in front, and load it with a birthday cake, two cups, and a teapot. Add the low railing along the outer edge and lay a rectangular lilac rug near the sofa’s feet. Close to the railing, place a potted floor plant for depth. Make sure the sofa faces the cake table and the rug aligns with the walkway’s texture lines. This middle tier anchors the composition and gets the most visual attention, so getting the furniture angles right is critical.
Drop to the lower-left platform and establish the study desk area. Place the desk with the open book, rolled blueprint, pencil cup, and tiny globe. Arrange the book open in the center, sticky notes near one corner, notebooks to the left, and the pencil holder to the right. Put the chair in front of the desk, and add the small round mirror and framed photo nearby. Scatter the papers slightly and angle the globe so the desk looks used and inviting. This study area helps the eye move from the social tier down to the work zone, creating visual flow.
On the lower-right terrace, place the kidney-shaped pool with floaties and a fence. Float a striped beach ball and a lifebuoy in the water, arrange the curved wooden fence along the pool’s right margin, and lay stepping stones from the main path to the pool entrance. Between the pool and the walkway, add a broad-leaf tropical plant and a small tea table with a cup and stool. The pool area gives the scene outdoor balance; spacing the stones and fence correctly creates a natural walkway and ensures the pool’s edge meshes with the terrace elevation.
On the front lower ledge, add vegetable garden boxes, a sign, and shrubs. Place the wooden crates in a row: one with carrots, one with cabbage, and a seedling row with a sprout sign. Arrange a display board in front and scatter ornamental bushes and vines along the front rim. Add a small stone and rock outcropping near the garden’s right side. The garden provides foreground interest; position crates flush with the terrace edge and angle the sign toward the viewer.
Finish with trailing vines, potted plants, and accessories to enhance detail. Drape long vines down the right wall, wrap short garlands around the top platform rims, and add small potted plants on ledges. Place a floor cushion near the sofa, the tiny rug by the walkway, a coffee mug on the side table, and the stool near the ladder base. Tuck in a framed picture, remaining books, a globe, and the cake box. Tiny offsets like a tilted cup or askew pillow make the room feel lived-in. Do a final pass to check shadows and ensure no items float or clip.
Features of Dreamy Room Level 341
Structural Anchor: The Central Tree Trunk
The tree trunk and ladder form the core of this level’s design. I can’t stress enough how important it is to place these first. The trunk sits in the geometric center and acts as the vertical axis for all platforms, railings, and decorative vines.
When you position the trunk correctly, every other object snaps into place more easily because you have a clear reference point. The ladder must attach to the front face of the trunk so its rungs line up from the bottom deck to the top platform. String lights wrap around the rungs to create a warm glow, and the small clock and nightstand at the trunk’s base ground the structure. This anchor point determines where platforms sit and how shadows fall, so getting it right saves you hours of rework later.
Multi-Tier Design with Distinct Zones
This level features multiple platforms, each with a specific purpose and furniture set. The top-right platform holds the bedroom with a bed, ottoman, nightstand, and trailing vines. The top-left platform hosts a rooftop garden with an easel, stool, and dense greenery. The middle-tier walkway includes a social area with a sofa, table, and birthday cake. The lower-left platform contains a study desk with books, a globe, and scattered papers.
The lower-right terrace features a kidney-shaped pool with floaties and a fence. The front lower ledge displays a vegetable garden with crates, carrots, and cabbage. Each zone has its own visual identity, but they all connect through the central trunk and ladder. This multi-tier design creates depth and invites players to explore every corner of the scene.
Visual Composition: Layering and Shadowing
Realistic layering and consistent shadowing are key to making this level feel three-dimensional. Objects that should appear in front — like the sofa and table — must be layered above nearby walkways. Lamps and mirrors must reflect a consistent light direction to avoid a flat look.
I always check z-order to ensure that vines drape over railings, that stepping stones sit on the terrace surface, and that floaties float in the water rather than hovering above it. Small overlaps between foliage and platform rims read as realistic layering rather than clipping errors. These visual details make the difference between a scene that looks assembled and one that feels lived-in and coherent.
Gameplay Considerations: Clear Paths and Usability
Walking paths must stay clear so characters can reach ladders, the pool, and other interactive areas. I always check that stepping stones lead from the main path to the pool entrance, that the ladder has space at its base for a character to start climbing, and that the study desk chair has room for someone to sit. Overcrowding kills usability — if you pack too many plants or crates into a small area, characters can’t navigate and the level feels cluttered. Leaving negative space around key objects makes the scene easier to use and more pleasant to look at.
Similar Games
- Dreamy Room Level 276 Walkthrough
- Dreamy Room Level 50 Walkthrough
- Dreamy Room Level 153 Walkthrough
Final Words
You’ve now mastered every corner of Level 341’s intricate treehouse design. This comprehensive guide walked you through the critical central trunk placement, the three-tier platform system, and over fifty decorative elements that transform empty space into a breathtaking vertical retreat. From the cozy bedroom perched at the top-right to the refreshing pool terrace below, each zone demands precision and spatial awareness.
Always anchor your build with the tree trunk first, then work methodically from top to bottom—bedroom, garden studio, social walkway, study desk, pool area, and vegetable garden—before layering in vines, lighting, and those personality-rich details like the tilted easel or scattered desk papers.
What sets this level apart is its vertical storytelling. The ladder doesn’t just connect platforms; it guides your eye through a narrative of rest, creativity, celebration, work, and leisure. String lights soften hard edges, trailing plants blur boundaries between indoor and outdoor, and furniture angles invite imaginary inhabitants to linger. Remember to check z-order frequently, leave clear walking paths, and embrace slight asymmetry—real spaces breathe, and yours should too.
With this walkthrough in hand, you’ve conquered one of Dreamy Room’s most demanding challenges and gained skills that will carry you through every complex level ahead.


