
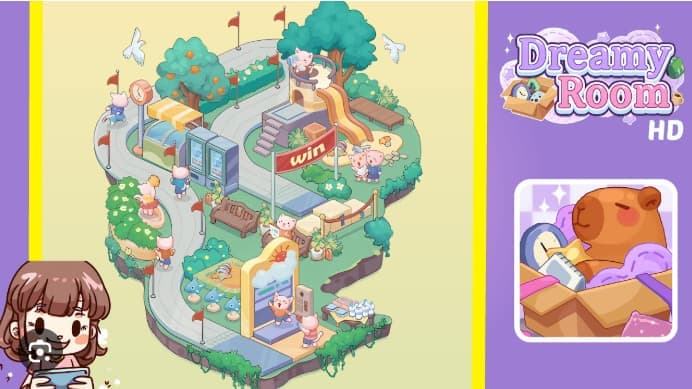









Dreamy Room Level 329 can be solved! This charming park-themed puzzle requires you to build a looping racetrack island complete with a castle tower, yellow slide, photo arch, and adorable cat characters positioned throughout the scene.
Level 329 sits within the 321-330 range and presents a unique challenge: balancing a busy outdoor festival layout without overcrowding the central walking path. Unlike earlier levels, this stage demands precise spatial awareness—every bench, vending machine, and flagpole must align perfectly to create a cohesive park atmosphere while keeping the track clear for your feline visitors.
Why Level 329 Trips Up So Many Players:
- Platform variations: Android and iOS versions may show different object layouts for the same level number
- Layering complexity: The tower, slide, and awning must stack visually without overlapping
- Character placement: Ten cats need exact spots to tell the story without blocking pathways
- Curved boundaries: The island’s organic shape makes straight-line thinking fail
Whether you’ve been stuck for hours or just want to perfect your three-star rating, this guide breaks down every placement step—from laying the initial looping path and flag posts, through installing the central tower and slide structure, to positioning each cat character for maximum charm. You’ll learn the exact order pros use to avoid crowding, plus tricks for aligning the tricky left-side utility cluster (awning, greenhouse, clock, vending machines) against the right-side play zone (slide, sandy pit, “win” banner).
Dreamy Room Level 329 Walkthroughs & Guide
Dreamy Room Level 329 Walkthrough transforms a blank island into a vibrant park filled with paths, towers, slides, and playful cats. The key is building layer by layer—starting with the ground loop, then adding hedges and trees, and finally sprinkling in characters and props. I’ve found that rushing through this level creates visual chaos, so we’ll move step by step to ensure each element sits exactly where it belongs.
Begin with the looping path. Lay down the pale-gray walkway that circles the island like a mini racetrack. Nudge the left curve inward to carve out a flower knoll, and let the right side bow outward to make room for the slide zone. Insert slender poles with red flags at regular spots along the curb—one near the front-left, another by the photo arch, a few along the back stretch, and one at the right bend. Trim the front-center edge with dangling green ivy, and drop square pavement tiles at the front-left corner where the path meets the border. This groundwork anchors everything in Dreamy Room Level 329 and shows you where interactive items will land.
Next, fill the track interior with greenery. Line the back straightaway with low hedges that carry yellow blooms. Mirror this on the left-front knoll with a rounded hedge patch packed with white-yellow flowers. Tuck small shrub clumps near the front edge under the arch area, and scatter tiny green tufts on the grass to avoid bare spots. For motion and charm, place two white doves high in the sky—one upper-left, the other upper-right, both angled toward the central tower you’ll add soon. This step sets a soft, garden vibe and prepares visual anchors that the eye can rest on when the busy play elements arrive.
Now install the big structures. Plant the orange tree with fruit on the left-back corner just inside the loop, and place a broader-canopy green tree on the right-back, slightly behind the tower area. Build the castle-like play tower in the upper-middle-right, with stone steps leading up from the center of the island. Add the round balcony on top and attach the curving yellow slide that descends into a sandy play pit at the right-middle. Ring the sandy area with a rope barrier and connect a red “win” banner across the path just in front of the pit—its poles sit on the inner and outer curb. Fit small potted plants at the top of the steps. This solid backbone is crucial for the spatial rhythm in Dreamy Room Level 329 Walkthrough.
Shift focus to the left-middle amenities. Slide in the yellow-and-white striped awning above a curved glass greenhouse roof, nestled under the orange tree. To its right, align two gray-blue vending machines side by side facing the path. Plant a round-faced street clock on a tall gray pole just left of the awning so its face looks toward the track curve. Add a wooden bench on the inner grass slightly right of the vending machines, oriented so walkers can rest facing the central steps. These utility pieces make the park believable and must be spaced so none spills into the walkway. Getting this cluster precise keeps the level from feeling crowded on the left.
At the front-center, position the attractions. Place the tall sunrise photo arch with a cloud motif flush with the path edge, its base stepping onto the tiles you placed earlier. To the right of the arch, attach the small coin box that a player can tap. On the front-left meadow near the tiles, line up five small blue duck statues like a parade, curving gently with the curb. Between the duck row and the arch, lay a tiny play patch with a striped beach ball and a fish toy half-buried. Reinforce the front border with a tufted shrub cluster below the arch and continue the ivy swag along the island edge. These details create an inviting entry zone.
Finish the right side with seating and garden touches. Place a second wooden bench tucked behind the slide’s sandy pit, parallel to the back hedge. Plant a flower bed with yellow blooms just ahead of this bench, softening the transition from sand to grass. Scatter a few star-shaped fallen leaves on the grass to the right of the slide’s landing area. On the front-right corner, set a service table: stack bottled water in a neat grid and place a small pile of newspapers beside it. Ensure the table faces the main path so racers can grab a drink after passing under the “win” banner. These finishing touches balance the composition.
Characters are the heartbeat of this level. Put a cat inside the sunshine arch raising its arms, and a striped-sweater cat at the control box to the arch’s right. Seat a confident cat with a megaphone on the tower balcony. In the sandy pit, place two kittens wearing little ribbons chatting near the slide exit. On the middle steps leading up to the tower, add a tiny cat peeking from the side opening. Along the left path, position one cat below the clock, another blond-curled cat walking toward the bench, and at least two more cats hugging flagpoles on the front-left and mid-left boundaries. Place a small cat strolling near the vending machines. With these placements, the scene feels bustling but coherent, and you’ve completed the full Dreamy Room Level 329 Walkthrough.
How to Play Dreamy Room Level 329 Walkthrough
Playing Dreamy Room Level 329 Walkthrough requires a blend of spatial awareness and patience. Unlike earlier stages that let you drop items anywhere, this park-themed puzzle demands precise alignment. I’ve learned that the game rewards players who think in layers—ground first, then structures, then details, and finally characters. Each item has a “snap zone” that glows faintly when you drag it near the correct spot. If you miss that zone by even a small margin, the object will bounce back to your inventory tray.
Start by understanding the item tray layout. At the bottom of your screen, you’ll see a scrollable bar with all the pieces for this level. The game groups them loosely by category: paths and tiles on the left, plants and trees in the middle, structures and furniture toward the right, and characters at the far right. I recommend sorting through the tray before you begin placing anything. Tap each item once to preview its size and shape. This mental map saves time later when you’re hunting for a specific shrub or flag pole.
Drag items with a light touch. The game’s physics engine is sensitive—if you swipe too fast, the item will overshoot its target. Instead, press and hold gently, then slide your finger slowly toward the island. Watch for the green glow that signals a valid placement zone. If the glow turns red, you’re either overlapping another object or trying to place something outside the island boundary. Release your finger when the glow is green, and the item will lock into place with a soft chime.
Rotate items by tapping the rotate button. Some pieces, like benches and tables, need to face a certain direction to look natural. After dragging an item to the island, you’ll see a small circular arrow icon near the bottom-right corner of the screen. Tap it to rotate the object 90 degrees. Keep tapping until the item faces the way you want. For example, the bench near the vending machines should face the central steps, not the island edge. Getting these rotations right makes the final scene feel intentional rather than random.
Use the zoom and pan controls. Pinch the screen to zoom in for tight placements, like fitting the duck statues along the curved curb. Drag two fingers across the screen to pan around the island and check every angle. I’ve found that zooming out after placing a few items helps me spot empty zones or crowded corners. The game doesn’t penalize you for adjusting placements, so feel free to move things around until the composition feels balanced.
Follow the suggested order in the walkthrough. While the game technically lets you place items in any sequence, following the step-by-step guide ensures you don’t paint yourself into a corner. For instance, if you place the tower before laying the path, you might block the path’s natural curve. If you scatter characters before adding the slide and benches, you’ll have to move them later to make room. The walkthrough’s order is designed to minimize backtracking and rework.
Check your progress with the preview button. At the top-right corner of the screen, there’s a small eye icon. Tap it to see a translucent overlay of the completed scene. This preview shows you where every item should go, though it doesn’t label them. Use it as a reference when you’re unsure about placement. However, don’t rely on it too heavily—part of the fun in Dreamy Room Level 329 Walkthrough is solving the spatial puzzle yourself.
Save your progress by completing sections. The game auto-saves after you place each item, so you can exit and return without losing work. However, I recommend finishing one full section—like the left-side amenities or the front attractions—before taking a break. This keeps your mental model of the layout fresh and makes it easier to pick up where you left off.
Features of Dreamy Room Level 329 Walkthrough
Dreamy Room Level 329 Walkthrough stands out for its intricate blend of natural and playful elements. The level introduces a looping path system that mimics a real park’s circulation, forcing you to think about how visitors would move through the space. This isn’t just a random scatter of objects—it’s a miniature world with flow, focal points, and functional zones. The pale-gray walkway acts as the spine, guiding your eye and your placement decisions.
The hedge and flower system creates depth. Instead of flat grass, this level uses layered greenery to suggest elevation changes. The left-front knoll with its rounded hedge patch sits higher than the back straightaway, even though the game’s 2D engine doesn’t show true height. The yellow blossoms along the back and the white-yellow flowers on the knoll add color contrast, breaking up the green monotony. Tiny shrub clumps and scattered tufts fill in the gaps, ensuring no bare patches interrupt the lush vibe.
Large structures define the spatial hierarchy. The castle-like play tower is the visual anchor—it’s the tallest element and sits slightly right of center, drawing the eye immediately. The orange tree and broader-canopy green tree frame the tower on either side, creating a natural “gateway” effect. The yellow slide curves dynamically from the tower’s balcony down to the sandy pit, adding motion and energy. These big pieces establish the park’s character before you even add the smaller details.
Amenities bring realism and storytelling. The yellow-and-white striped awning over the greenhouse roof suggests a shaded rest area, while the twin vending machines offer refreshments. The street clock adds a touch of urban park charm, and the wooden benches invite visitors to sit and watch the action. Each amenity has a purpose—you can imagine a cat grabbing a snack from the vending machine, checking the time on the clock, and then resting on the bench. This narrative layer makes Dreamy Room Level 329 Walkthrough more engaging than a simple object-placement puzzle.
Front attractions create an inviting entry. The sunrise photo arch with its cloud motif acts as a grand entrance, signaling that something special lies beyond. The coin box beside it suggests interactivity—maybe visitors pay to enter or activate a feature. The five blue duck statues parading along the curb add whimsy, and the play patch with the beach ball and fish toy hints at a family-friendly atmosphere. Ivy swags and shrub clusters soften the hard edges of the pavement, blending the built environment with the natural one.
Finishing touches balance the composition. The second bench behind the slide’s sandy pit mirrors the first bench near the vending machines, creating symmetry. The flower bed with yellow blooms transitions smoothly from the sand to the grass, preventing a jarring visual break. Fallen star-shaped leaves add a seasonal touch, suggesting autumn or a breezy day. The service table with bottled water and newspapers completes the utility zone, giving visitors a reason to linger near the “win” banner.
Character placement brings life and coherence. The cats aren’t just decoration—they tell a story. The cat in the photo arch is posing for a picture, while the striped-sweater cat at the control box is operating the park’s features. The confident cat on the tower balcony with a megaphone is announcing race results or cheering on participants. The two kittens in the sandy pit are playing after sliding down, and the tiny cat on the steps is peeking out curiously. Cats hugging flagpoles along the path act as cheerleaders, and the cat near the vending machines is taking a snack break. These placements make the park feel inhabited and joyful.
Alignment and spacing are critical features. The game enforces strict rules about overlapping objects and blocked pathways. If a bench or table spills onto the walking surface, the game won’t let you place it. The “win” gate must remain clear so racers can pass through. The tower and slide must sit right of center to avoid visual collisions with the left-side utility cluster. These constraints force you to plan carefully, turning Dreamy Room Level 329 Walkthrough into a satisfying spatial puzzle.
Similar Games
- Dreamy Room Level 257 Walkthrough
- Dreamy Room Level 150 Walkthrough
- Dreamy Room Level 93 Walkthrough
Final Words
Dreamy Room Level 329 challenges you to transform a blank island into a vibrant cat-filled festival park, and with the right approach, you’ll breeze through it. This stage tests your spatial planning—balancing a looping racetrack path with castle towers, yellow slides, photo arches, and ten charming feline characters—all while keeping walkways clear and visual flow intact.
The secret lies in building methodically: anchor the ground loop first, layer in hedges and trees, install major structures like the tower and slide, then add utility clusters (awning, vending machines, clock) before sprinkling characters throughout. Precision matters—benches must face the right direction, ducks need to arc along the curved curb, and the “win” banner poles must align perfectly on the path edges. Avoid rushing; zoom in for tight placements, rotate items carefully, and check the preview overlay only when stuck.
Common pitfalls include crowding the left-side amenities too close to the tower, letting objects spill onto the walkway, and placing characters before structures (forcing you to rearrange later). Follow the walkthrough’s sequence to sidestep these traps.


