








Dreamy Room Level 331 stands out as one of the trickier stages in the game, featuring a two-story bottled diorama that demands precise placement and careful attention to layering.
If you’ve made it past 330 levels, you already know that Dreamy Room tests your spatial reasoning and design skills. But Level 331 takes things up a notch with its intricate multi-level layout inside a glass jar. You’re tasked with creating a cozy, lived-in home complete with a lower living area, kitchen nook, suspended loft balcony, and upper bedroom—all while maintaining perfect perspective through curved glass.
What makes the Dreamy Room Level 331 Walkthrough so necessary? This level introduces several new mechanics:
- Dual-floor construction requiring exact alignment between ground and loft levels
- Isometric layering where placement order directly affects visibility
- Scale consistency across 30+ individual furniture and decor pieces
- Platform numbering differences between Android and iOS versions that can confuse even experienced players
Many players report spending 20+ minutes on their first attempt, only to find their carefully placed furniture obscured by foreground objects or misaligned with the bottle’s curvature. The Dreamy Room Level 331 Walkthrough below breaks down every placement into eight manageable steps, complete with pro tips on avoiding common pitfalls like loft misalignment and scale drift.
Dreamy Room Level 331 Walkthroughs & Guide
I want to help you solve this puzzle quickly and correctly. Dreamy Room Level 331 requires careful placement of every item inside the glass jar. We must start with the foundation and build upward, layer by layer, to create a cozy two-story home scene.
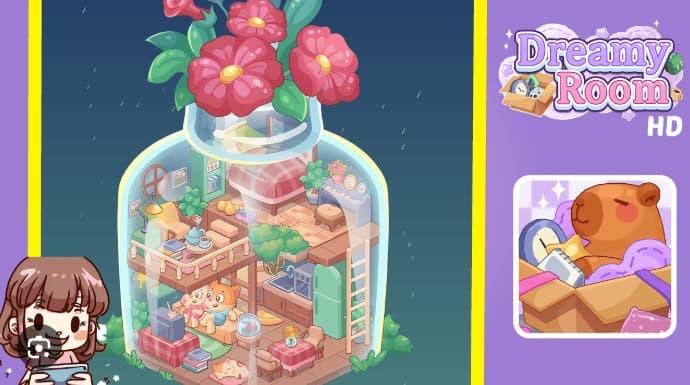
Begin by placing the terracotta floor tile at the jar’s base. This rounded rectangle must sit perfectly centered, flush against the curved glass walls. The brick pattern should face forward so you can see the texture clearly. Around the floor’s edges, add small tufts of green grass at all four corners—front-left, front-right, and both back corners. These grass clumps anchor the scene and give it an outdoor-meets-indoor charm. If the floor shifts even slightly off-center, everything else in Dreamy Room Level 331 will look crooked. Take your time nudging it into place. The floor sets the scale for furniture, walls, and the loft above. A proper base makes the rest of the work smooth and fast.
Next, build the lower living area on the left side of the floor. Place a low couch with two tiny figures seated on it, facing a small TV. Position the couch slightly back from the front glass so the characters’ faces stay visible. In front of the couch, set a red-checkered side table and put the old box TV on top. Stack two small books beside the TV on the floor. To the couch’s right, add a round side table and place the fishbowl with a goldfish on it. At the very front-left corner, lay down a pink rug and position the sleeping cat curled up on it. The cat should face inward, toward the couch and TV. This grouping tells a story: two friends watching TV while a cat naps nearby. Dreamy Room Level 331 rewards players who create narrative moments like this. Balance the spacing so nothing overlaps awkwardly, and make sure each piece is visible through the glass.
Now move to the lower-right area to add the dining nook and kitchen. Place a small square table with a red-checkered cloth near the front-right corner. Set two wooden chairs on opposite sides and add a tiny vase with flowers in the table’s center. Behind the dining set, install the kitchen counter and sink along the right wall. The silver sink and stove module should sit flush against the back-right corner. Next to the counter, place the tall mint-green fridge against the right interior wall. The fridge must stand between the counter and the ladder you’ll add later. If the fridge sits too close to the ladder or too far back, the upper loft won’t align correctly. These kitchen elements give Dreamy Room Level 331 its compact, snug feeling. Double-check that the dining table and fridge are properly spaced before moving on.
Construct the loft and balcony living area above the lower-left section. This wooden platform extends from the left wall and creates a balcony over the couch. Position short wooden railings along the loft’s front edge. On the balcony, place a cozy armchair and a small side table holding a tea set and stacked books. Add a tall standing lamp by the armchair and a small green potted plant near the railing. The loft must be high enough that the two characters on the couch below remain fully visible. Align the loft supports carefully so they line up with the floor beneath. A misaligned loft will break the isometric illusion that makes Dreamy Room Level 331 look three-dimensional. The balcony should feel like a private reading nook, separate but connected to the main living space.
Install the ladder, central tree, and vertical accents next. Along the right interior wall, lean the wooden ladder so it provides access from the kitchen to the upper bedroom. Near the ladder’s base, place a medium-sized potted tree. Its canopy should occupy the central interior space without blocking the fridge or sink. Add hanging green plants and small framed pictures along the interior walls to match the reference. These vertical elements create depth and draw the eye upward. Make sure the tree doesn’t obscure the kitchen area and that the ladder visually aligns with the loft opening above. Dreamy Room Level 331 uses vertical accents to make the jar feel taller and more spacious than it really is.
Outfit the upper bedroom on the upper-right platform. Place the bed with a red plaid blanket flush against the back-right interior wall. Position a small beige footstool near the piano area. Install the compact pastel piano along the far-right upper wall and put a little round stool in front of it. Scatter two small cushions and a patterned rug near the bed’s foot. Add two golden-orange round pillows near the center to match the reference. Place a petite bedside plant and decorative framed photos atop the piano area. The upper bedroom in Dreamy Room Level 331 should feel cozy and slightly crowded. Allow items to overlap a bit—that crowded warmth is intentional and adds to the lived-in charm.
Decorate the jar’s neck and cap with a floral crown. Arrange three large pink blossoms and surrounding green leaves centered above the jar’s neck opening. Position one rosebud slightly to the left and add water droplets nearby to simulate rain. The floral crown must sit as an exterior ornament, not too far forward. This top flourish frames the entire scene and is a signature element of Dreamy Room Level 331. Getting the scale right ensures the bottle still reads as a believable enclosure rather than a cropped backdrop.
Finish with small plants, lighting, and reflections. Place tiny potted plants near the front interior corners. Position two small framed pictures on the left wall near the loft. Drop a tiny tray of breakfast items on a kitchen counter. Adjust in-game lighting and glass reflections so soft highlights appear on the jar’s surfaces and faint rain streaks fall outside. The interplay between interior lamp glow and exterior glass reflections sells the diorama effect. Tweak light intensity until the couch area and bed both have warm highlights without washing out the pastel palette. These last adjustments complete the cozy atmosphere unique to this level.
How to Play Dreamy Room Level 331 Walkthrough
Dreamy Room Level 331 is all about precise placement and layering. You’ll drag items from your inventory and drop them into the jar scene. The goal is to recreate the reference image exactly, matching scale, position, and depth.
Start by selecting the floor tile from your item list. Tap and hold it, then drag it to the jar’s base. Release your finger when the tile is centered. The game will snap it into place if you’re close enough. If the tile looks off, tap it again and nudge it using small swipes. The floor must align with the jar’s curved edges. Once the floor is set, grab the grass clumps and place them at the four corners. These small items are easy to miss, but they’re essential for the scene’s outdoor vibe. Dreamy Room Level 331 rewards players who pay attention to tiny details like grass and flowers.
Next, build the lower living area piece by piece. Select the couch and drag it to the lower-left section. Position it so the two seated characters face forward. Then add the TV table and TV in front of the couch. Stack the books beside the TV. Grab the side table and fishbowl and place them to the couch’s right. Finally, add the pink rug and sleeping cat at the front-left corner. Each item should be visible through the glass without overlapping too much. If something looks wrong, tap it and adjust. The game lets you rotate items by swiping in a circle, so use that feature to angle the cat or couch correctly. This living area is the heart of Dreamy Room Level 331, so take your time getting it right.
Move to the dining nook and kitchen on the lower-right side. Drag the dining table and chairs into place near the front-right corner. Add the vase with flowers on the table. Then install the kitchen counter, sink, and stove along the back-right wall. Place the mint-green fridge next to the counter. The fridge is a tall item, so it will stand out. Make sure it doesn’t block the ladder spot or overlap the dining table. These kitchen elements must mirror the reference proportions. If the fridge sits too far forward, the loft ladder won’t line up later. Dreamy Room Level 331 punishes sloppy placement, so double-check your work before moving on.
Construct the loft and balcony above the lower living area. Select the wooden platform and drag it to the left side, above the couch. The platform should extend from the left wall and create a balcony. Add the railing along the front edge. Then place the armchair, side table, lamp, and potted plant on the balcony. The loft must be high enough that the characters on the couch below remain visible. If the loft sits too low, it will block the couch. If it’s too high, the scene will look disconnected. Align the loft supports with the floor below to maintain the isometric perspective. Dreamy Room Level 331 relies on this alignment to create depth and realism.
Install the ladder, tree, and vertical accents next. Drag the ladder to the right interior wall and lean it upward. The ladder should connect the kitchen area to the upper bedroom. Place the potted tree near the ladder’s base. Its canopy should fill the central space without blocking the fridge or sink. Add hanging plants and framed pictures along the walls. These vertical elements make the jar feel taller. They also guide the player’s eye from the lower living area to the upper bedroom. Dreamy Room Level 331 uses vertical accents to enhance the sense of space inside the bottle.
Outfit the upper bedroom on the upper-right platform. Drag the bed to the back-right corner. Add the footstool, piano, and stool along the far-right wall. Scatter cushions, rugs, and pillows near the bed. Place a bedside plant and framed photos on the piano. The upper bedroom should feel cozy and slightly crowded. Allow items to overlap a bit—that’s part of the charm. Dreamy Room Level 331 encourages players to pack the space with personality. If the bedroom looks too sparse, add more small items until it matches the reference.
Decorate the jar’s neck with the floral crown. Select the flower cluster and drag it above the jar’s opening. The blossoms should appear to sprout from the bottle’s neck. Add water droplets nearby to simulate rain. The floral crown must sit as an exterior ornament, framing the scene. If it sits too far forward, it will look like it’s inside the jar. If it’s too far back, it won’t be visible. Getting the scale right is crucial for Dreamy Room Level 331.
Finish by adding small plants, adjusting lighting, and previewing reflections. Place tiny potted plants near the front corners. Add framed pictures on the left wall. Drop a breakfast tray on the kitchen counter. Adjust the in-game lighting so soft highlights appear on the jar’s surfaces. Enable glass reflections to see faint rain streaks outside. The interplay between interior lamp glow and exterior reflections sells the diorama effect. Tweak light intensity until the scene has a warm, cozy feel. These final touches complete Dreamy Room Level 331 and bring the scene to life.
Similar Games
- Dreamy Room Level 328 Walkthrough
- Dreamy Room Level 341 Walkthrough
- Dreamy Room Level 137 Walkthrough
Final Words
Dreamy Room Level 331 challenges you to construct an intricate two-story diorama inside a glass jar, demanding precision that separates casual players from true design masters. This stage transforms your spatial reasoning skills into art, requiring you to balance a terracotta-floored living space, suspended loft balcony, compact kitchen nook, and cozy upper bedroom—all while maintaining perfect perspective through curved glass.
Success hinges on following the eight-step sequence: establishing your foundation with centered floor tiles and corner grass tufts, building the lower living area with its TV-watching duo and napping cat, assembling the dining and kitchen zone, constructing the loft platform with exact support alignment, installing vertical elements like the ladder and central tree, outfitting the upper bedroom with piano and plaid bedding, crowning the bottle neck with pink blossoms, and polishing with strategic lighting adjustments.
The walkthrough emphasizes working back-to-front to prevent occlusion errors, using micro-nudges for pixel-perfect placement, and enabling glass reflections to preview how lamp glow interacts with exterior rain streaks.
Players who master these techniques transform 30+ scattered furniture pieces into a cohesive, story-rich tableau that captures the warmth of a lived-in home suspended in glass—proving that patience and methodical placement conquer even the trickiest puzzle stages.


