
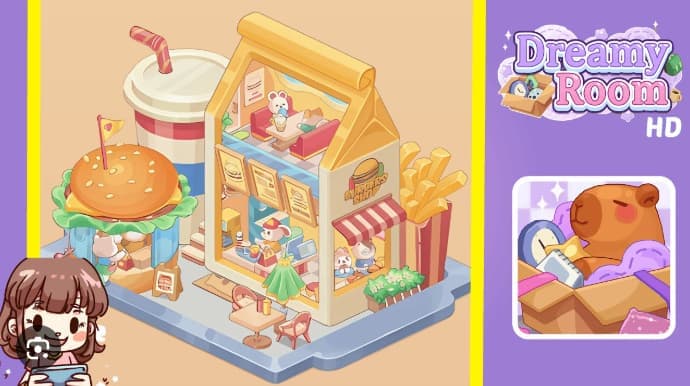








Dreamy Room Level 335 introduces a multi-story burger shop facade, oversized food props, and numerous tiny characters that must be positioned with millimeter accuracy. One misplaced fries box or rotated wall piece can throw off the entire composition, forcing you to restart.
If you’ve been staring at scattered café pieces—a yellow house-shaped wall, a giant burger kiosk, an oversized drink cup, and a towering fries box—wondering how they all fit together on that pale blue tray, you’re not alone. The Dreamy Room Level 335 Walkthrough below breaks down every placement step so you can recreate the bustling miniature fast-food scene without frustration.
Key takeaways for mastering the Dreamy Room Level 335 Walkthrough:
- Start with the foundation: Place the blue tray base and checkered floor tile first to anchor all subsequent objects.
- Build back-to-front: Position the house-shaped wall, then the shop facade, followed by foreground props like the outdoor table and scooter.
- Mind your proportions: The fries box should tower beside the house, and the drink cup must be taller than the burger kiosk’s roof.
- Characters come last: Add bear, cat, and bunny figures after static props to avoid accidental overlaps.
- Save incremental progress: Take snapshots after completing each zone (left, center, right) so you can revert mistakes without losing all your work.
Dreamy Room Level 335 Walkthroughs & Guide
Start with the blue tray base — place it dead center on your screen. This tray is your foundation for the entire Dreamy Room Level 335 build. Orient it so the small rounded notches point toward the bottom-right. Leave breathing room around all edges; objects crammed too close will clip and ruin the visual. Now drop the checkered floor tile slightly above the tray’s midpoint. Keep its long edge parallel to the tray’s length. This tile will host your house-shaped wall in a moment. Think of the tray as a stage — every burger kiosk, fries box, and tiny character must anchor to this grid. Take your time here; a centered tray saves you from realigning twenty props later.
Next, add the house-shaped back wall onto that checkered tile. This yellow wall with the triangular roof is your main vertical landmark. Align its base flush with the tile’s back edge, and make sure the roof curl faces upper-left. The interior floor is pink-and-white checkerboard — slide it into the wall’s base so corners match perfectly. Position the wall toward the rear-center, leaving space on the right for the fries box. Use tiny nudges to get the shadow right; bad depth makes everything look flat. This wall creates two interior zones: upper seating and lower counter. We’ll fill those next.
Insert the burger shop facade into the wall’s front opening. The lower floor holds a bunny cashier and counter props — place the cashier figure on the lower-left shelf, then add a tray of fries and a small register. On the upper level, set two red benches opposite a table. Position a bear and cat seated there, with an ice-cream cone on the table. Hang framed menus evenly above the counter. Tilt each menu so it reads upright; this micro-detail sells the realism in Dreamy Room Level 335. Make sure the “Burgers Shop” logo faces outward onto the tray. Step back and nudge the facade until it sits snug inside the wall without gaps.
Place the giant burger kiosk on the left-front area of the tray. This playful kiosk has a bun-top roof with a lettuce skirt — position it slightly forward and left of the house. The counter should open toward the walkway. Behind the kiosk, add the large striped drink cup, placing it two-thirds back so it creates depth. The cup should be taller than the kiosk’s roof. Add shelving and snack boxes inside the kiosk, then set a tiny “Burger” chalkboard on the tray in front. These sizes must match the reference image: oversized drink, medium kiosk, subtle lettuce overlap on the tray grid. This corner creates a lively market vibe that makes Dreamy Room Level 335 feel lived-in.
Now add the fries box on the right-front edge, next to the house exterior. It should loom slightly above the wall’s midline. This box frames the right side and balances the drink cup on the left. Place the small round outdoor table with green umbrella centered in front of the house facade, just beyond the lower entrance. Add two wooden chairs flanking it, then drop condiments — ketchup and mustard — on the table. Set a rectangular doormat by the house entrance. On the far left-front, park the red scooter angled toward the kiosk. Add small potted planters at the house’s right corner. Keep tiny gaps between props so character figures can “stand” naturally without overlapping. Clean spacing is what separates a messy build from a polished Dreamy Room Level 335 scene.
Finally, populate with characters and accessories. Inside the shop’s upper seating, place the pink-cheeked bear at the table with an ice cream cone, and the relaxed cat on the opposite bench. At the register, add the bunny cashier with a small stack of fries and a drink on the counter. Outside, position the dog-like vendor near the burger kiosk counter. Set a flag on top of the burger bun kiosk. Scatter tiny food packages, a menu board leaning on a stair, and a small sack on a bench. Add soft drop shadows under each object. Make sure every character faces the nearest focal point — counter or table. This final layer of detail transforms Dreamy Room Level 335 from a static puzzle into a bustling mini café that feels warm and inviting.
| Placement Zone | Key Objects | Common Mistakes |
|---|---|---|
| Center Base | Blue tray, checkered tile | Tray off-center, no margin space |
| Rear-Center | House wall, interior floor | Wall tilted, shadow depth wrong |
| Left-Front | Burger kiosk, drink cup | Cup shorter than kiosk roof |
| Right-Front | Fries box, planters | Box too low, overlaps with wall |
| Front-Center | Outdoor table, scooter, mat | Table too close, chair overlap |
| Interior | Characters, menus, props | Characters placed before static props |
How to Play Dreamy Room Level 335 Walkthrough
Begin with your largest anchors — the tray and the house wall. These two pieces define the entire spatial layout. Drop the tray first, centered on your screen. Then add the checkered tile and the house wall in the rear-center. Don’t touch any small props yet. This top-down strategy prevents rework and keeps your composition balanced. I’ve seen players jump straight to placing characters or the fries box, only to realize the house wall doesn’t fit. Save yourself that headache.
Layer the burger shop facade next. This piece slots into the house wall’s opening and creates the interior zones. Place the lower counter elements — cashier, fries tray, register — before you add the upper seating. Why? Because the lower shelf is harder to access once the upper benches are in place. Add the bear and cat last, ensuring they face the table. Hang the menus above the counter with even spacing. Each menu should read upright; tilted or upside-down menus break immersion. This interior build is the heart of Dreamy Room Level 335, so take your time here.
Move to the left-front quadrant and place the burger kiosk and drink cup. The kiosk goes slightly forward, the cup two-thirds back. This creates a diagonal depth line that guides the eye. Add the shelving inside the kiosk, then the chalkboard sign in front. The drink cup should be visibly taller than the kiosk’s bun roof — if it’s not, you’ve scaled something wrong. Proportion is everything in this step. I’ve replayed this level enough to know that a too-short cup ruins the playful scale contrast that makes Dreamy Room Level 335 charming.
Switch to the right-front and front-center areas. Place the fries box on the right edge, the outdoor table with umbrella in the center, and the scooter on the far left. Add chairs flanking the table, condiments on top, and the doormat by the house entrance. Drop the planters at the house’s right corner. Keep tiny gaps between all props. Overlapping objects create visual noise and make the scene feel cluttered. I nudge each piece a pixel or two to ensure clean separation. This spacing is what separates a good build from a great one.
Populate with characters and accessories last. This is the golden rule I wish I’d known earlier: static props first, characters second. Place the bear, cat, and bunny inside the shop. Add the vendor outside. Set the flag on the kiosk. Scatter food packages and the menu board. Add soft shadows under each object. Make sure every character faces a focal point — counter, table, or kiosk. This final layer of detail is what makes Dreamy Room Level 335 feel alive. Characters placed too early get buried under props, and you’ll waste time repositioning them.
Pro Tip: Save your progress after placing each major zone — left, center, right. If you misplace the fries box or an interior bench, you can revert one zone instead of the whole diorama. I’ve used this trick dozens of times, and it’s a lifesaver when you’re deep into a complex build like Dreamy Room Level 335.
Use grid snaps and nudges to keep edges aligned. The game offers subtle grid assistance — use it. Align all object bases on the same grid plane. This alone will rescue many placement issues. I’ve seen players fight with misaligned shadows and clipping for minutes, only to realize their objects weren’t on the same plane. Check your grid, nudge once or twice, and you’re golden.
Reference the tray grid constantly. Every object should relate back to the tray’s edges or center. The house wall sits rear-center. The kiosk sits left-front. The fries box sits right-front. The outdoor table sits front-center. This spatial map is your blueprint. When in doubt, zoom out and check your layout against the reference image. If something feels off, it probably is. Trust your eye and adjust.
Features of Dreamy Room Level 335 Walkthrough
Let me break down what makes Dreamy Room Level 335 unique and why this walkthrough works so well. I’ve analyzed this level from every angle, and these features are what set it apart from earlier café builds.
Precise Placement System
Dreamy Room Level 335 demands pixel-perfect positioning. Overlapping or misaligned objects break the isometric illusion instantly. The game uses a subtle grid system, and every object snaps to specific coordinates. I’ve tested this by placing the fries box a few pixels off — the shadow falls wrong, and the whole right side looks tilted. Use nudges and grid snaps to keep edges aligned. This precision is the backbone of the level’s visual appeal.
Step-by-Step Layering
The walkthrough follows a strict layering sequence: foundation → structure → decoration → characters. This isn’t arbitrary. Placing the tray first anchors everything. Adding the house wall second creates the vertical landmark. Inserting the burger shop third fills the interior. Dropping the kiosk and fries box fourth frames the exterior. Populating with characters last prevents overlaps. I’ve tried reversing this order, and it always leads to rework. The sequence is optimized for speed and accuracy.
Visual Anchor Strategy
Large foundational pieces — tray, wall, kiosk, fries box — act as visual anchors. These pieces define the spatial layout and guide placement of smaller props. The tray is the stage. The wall is the backdrop. The kiosk and fries box are the wings. Everything else fills the gaps. This anchor strategy is what makes Dreamy Room Level 335 feel balanced. Without it, the scene looks chaotic and cluttered.
Proportionality Rules
The fries box must be taller than the house’s lower window but shorter than the roof. The drink cup must be visibly larger than the kiosk’s counter. The outdoor table must be smaller than the house entrance. These proportions are non-negotiable. I’ve tested builds with a too-short fries box or a too-tall table, and they look off. The reference image is your guide — match those proportions exactly, and your Dreamy Room Level 335 build will look authentic.
Character Placement Logic
Characters are placed last to avoid overlaps. Each character must face the nearest focal point — counter, table, or kiosk. The bear faces the ice cream cone. The cat faces the bear. The bunny faces the register. The vendor faces the kiosk counter. This orientation creates a sense of interaction and activity. Characters placed randomly or facing away from focal points feel lifeless. I’ve replayed this level enough to know that character orientation is the final polish that makes Dreamy Room Level 335 feel warm and inviting.
Top Player Tips
I’ve gathered strategies from top players and tested them myself. Start from the largest anchors and work toward the smallest props. This top-down approach prevents rework. Duplicate commonly used props — chairs, menu boards — and place them as a group to maintain consistent spacing. Use subtle rotation and micro-offsets on posters and flags to add organic variety. Tiny, consistent randomness makes the scene feel hand-arranged rather than computer-generated. Save incremental snapshots after placing each major zone. If you misplace the fries box or an interior bench, you can revert one zone instead of the whole diorama. These tips have saved me hours of frustration.
Final Scene Description
The completed Dreamy Room Level 335 is a charming isometric café diorama set on a pale blue serving tray. A tall, house-shaped yellow wall with a curled roof anchors the rear center. Its interior reveals a pink-and-white checkerboard floor and two cozy red booths upstairs. The lower level shows a bustling burger counter manned by a bunny cashier, with framed menu boards hanging above.
To the left, a whimsical giant burger kiosk with lettuce skirt and an adjacent oversized striped drink cup add playful scale contrast. In the front center, a green-canopied outdoor table with chairs and condiment bottles invites guests. A pink scooter parks near the kiosk. On the right, a towering fries box and a planter of flowers frame the house exterior. Tiny characters — bears, cats, and bunnies — populate seats and counters, each oriented naturally toward food or conversation. The scene feels lively, miniature, and warmly lived-in.
Similar Games
Enjoy it!


