
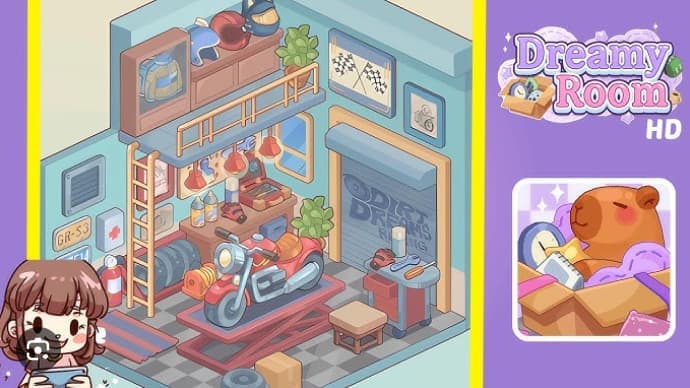











Dreamy Room Level 328 can be solved with the right placement strategy. This racing garage scene requires precise positioning of over 40 items—from the DIRT DREAMS RACING door to the red motorcycle on the scissor lift—and one wrong placement can throw off your entire layout.
Level 328 stands out as one of the trickier mid-300s challenges because it combines vertical layering (the mezzanine catwalk with helmets and cabinets) with dense floor clutter (tire stacks, tool carts, and a central lift). Many players struggle with the crowded left wall where the ladder, license plates, first-aid box, and fire extinguisher must fit without overlapping. Getting the pendant lights to hang correctly over the workbench while leaving room for the window is another common sticking point.
Here’s what you’ll master in this Dreamy Room Level 328 walkthrough:
- Wall anchor strategy – Install the roll-up garage door and mezzanine cabinets first to establish your spatial framework
- Catwalk assembly – Correctly position the platform, safety rail, wooden ladder, and three racing helmets
- Workbench zone – Arrange the pegboard, pendant lights, oil bottles, toolbox, and window without collisions
- Motorcycle placement – Center the red bike on the scissor lift so it becomes the room’s focal point
- Floor clutter tricks – Distribute tires, tool cart, stool, and cardboard box for a realistic workshop feel
- Common mistakes – Avoid the overlaps and spacing errors that force most players to restart
Dreamy Room Level 328 Walkthroughs & Guide
When you first open Dreamy Room Level 328 Walkthrough, you’ll see a racer’s garage waiting to come alive. I’ve spent hours on this puzzle, and I can tell you the secret is starting with your biggest wall pieces. Drop that steel roll-up door on the right wall first—it’s your anchor. The door reads “DIRT DREAMS RACING” in bold letters, and you want it centered, sitting about one tile above the floor line. This isn’t just random advice; when I skipped this step once, every other item felt wrong. The door’s pale gold casing frames the whole right side, and if it’s even slightly off, your tool cart and stool won’t line up later in Dreamy Room Level 328 Walkthrough.
Next, hang those two racing art frames above the door. The big one shows crossed flags—place it above and slightly left of the door’s top edge. The smaller frame with the green bike goes to its right. Keep them level, like pictures on your bedroom wall. Leave a tiny gap between them so they don’t look crowded. I learned this the hard way: overlap the door trim, and your window plant cluster won’t balance right. These frames add color and energy to Dreamy Room Level 328 Walkthrough without blocking anything critical below.
Now shift your focus to the top left. Install those wooden storage cabinets high on the left wall, pushed all the way to the back corner. Start with the glass-front cabinet that displays a riding jacket—yellow and blue, really eye-catching. To its right, snap in three open cubbies. On top of this whole run, line up three helmets: blue with a white wing, red in the middle, teal with cat ears on the right. Cap it off with a leafy potted plant at the far right end. This setup creates the overhead story in Dreamy Room Level 328 Walkthrough and supports the catwalk you’ll add next.
Under those cabinets, lay the short blue catwalk platform. Attach the pale yellow safety rail along its outer edge—it’s like a mini balcony. Now lean the light-wood ladder against the left interior wall so it lands on the catwalk’s left edge. The ladder should rise just in front of the cabinets, with rungs clearing the cabinet doors. I can’t stress this enough: ladder placement is critical. Too far forward, and it crowds your fire extinguisher; too far back, and it blocks the cabinet. Get it right, and the ladder frames your tire rack beautifully below.
The left wall is where things get tight. High and centered, mount the gray ventilation grille. Below it, stack three license plates vertically: “GR-S3” at the top, “GR7E14” in the middle, “LAMEIS” at the bottom. To the right of these plates, mount the white first-aid box with its red cross. On the floor beneath all this, park the red fire extinguisher with a blue cap, hugging the corner near the ladder. Finally, roll out that red-and-blue striped floor mat at the bottom left. These pieces must fit like puzzle blocks—no overlap, no gaps. I’ve seen players rush this part and end up with a fire extinguisher floating in midair. Take your time here.
Now build your work zone. Slide the two-drawer wooden workbench against the back wall under the catwalk. Above it, hang the beige pegboard showing tool silhouettes—wrench and pliers. Add three red pendant lights in a row under the catwalk lip. Set the small yellow-framed window to the right of the pegboard, just clearing the third lamp. On the bench surface, arrange two yellow oil bottles at the left, then a tall spray can, a single red glove, and an open red toolbox with screwdrivers and wrenches inside. This cluster is the heart of your garage. Keep the heights varied so the lamps read clearly—you want that warm glow to highlight your tools.
Behind the ladder and just left of the bench, place the horizontal metal tire rack loaded with dark tires. They should be stacked in a neat row, peeking out from behind the ladder. At floor level near where your motorcycle will go, place the small orange air tank—it’s a compressor, really. Add a thin framed print to the far left of the pegboard; it’s a pale technical poster that completes your wall collage. Accuracy matters here: the tire rack should be visible but not blocking the ladder, and the compressor must sit forward enough to catch the eye.
Drop the red scissor lift platform squarely in the room’s middle. Align it with the floor tiles—use those seams as your guide. Place the red motorcycle on top, oriented so the headlight faces the left-front corner. The leather saddle and chrome exhaust should be fully visible. I always check that the front wheel doesn’t stick out past the lift’s leading edge. This motorcycle is your focal object; every other prop radiates from it. Get it perfect, and the whole room clicks into place.
Set the second leafy potted plant on the floor between the bench’s right side and the garage door jamb. Its leaves should overlap the door trim slightly but not hide the door handle area. Up above, confirm the first plant remains on the catwalk’s far right end, inside the safety rail. This mirrored greenery softens the industrial vibe and frames the window. Plants are surprisingly strict in this puzzle: move them too far, and you lose that visual triangle formed by lamp, window, and leaves.
Roll the red tool cart with a gray curved top to the right-front floor, just inside the door plane. Its blue wheels should sit diagonally, one barely visible. On the cart top, place the green spray can, a pair of red gloves, and an orange-handled wrench laid horizontally. Add the small beige stool just left of the cart, square to the floor grid. The cart and stool create a mini service station by the door. If the stool tucks too far under the lift, it feels lost—keep it independent.
At the very front edge, slightly left of center, stack two loose tires with a third leaning against them. A sealed tan cardboard box goes immediately to their right, tucked under the scissor lift’s front cross-brace shadow. This small mess should not block the stool’s pathway. These items complete the scene’s realism and help your eye travel from foreground to motorcycle. Many players misplace the box behind the lift; don’t do that. Its tape top must be visible to echo the pale highlights on the helmet row above.
Before calling it done, zoom in and confirm three pendant lamps hang evenly over the bench. Check that the motorcycle’s headlight sits under their glow. Make sure no item overlaps the catwalk rail. Ensure the first-aid box doesn’t clip the ladder upright, the fire extinguisher touches the wall base, and the striped rug does not pass the room’s bevel edge. On the right, the small motorcycle frame should align with the top of the checkered-flag frame. These tiny tweaks are what separate a good solution from a perfect one.
How to Play Dreamy Room Level 328 Walkthrough
Playing Dreamy Room Level 328 Walkthrough is all about sequence and spatial awareness. You’re not just dropping items randomly; you’re building a coherent space. I always start by identifying the biggest objects in the inventory. The steel roll-up door is your first move—it’s the tallest, widest piece, and it sets the scale for everything else. Place it on the right wall, centered, about one tile above the floor. If you nail this, you’ve created a reference point. Every other item will key off this door’s height and position.
Next, tackle the decorative elements. Those two racing art frames go above the door. The large frame with crossed checkered flags sits above and slightly left of the door’s top edge. The smaller rectangular frame showing a green motorcycle goes to its right. Keep them on the same horizontal band. I like to imagine a shelf line running across the wall—both frames sit on that invisible shelf. This keeps your wall looking organized and prevents the frames from blocking the door’s crown molding.
Now move to the top left. Install the mezzanine storage cabinets high on the left wall, flush to the back corner. Start with the glass-front cabinet that displays a yellow-and-blue padded riding jacket. To its right, set three open cubbies. On top, place three helmets left-to-right: blue with a white wing accent, red, then teal with cat-ear styling. Cap the run by placing a leafy potted plant at the far right end. This overhead layer creates depth and gives you a place to attach the catwalk later.
Under those cabinets, lay the short blue catwalk platform. Attach the pale yellow safety rail along its outer edge. Now lean the light-wood ladder on the left interior wall so it lands on the catwalk’s left edge. The ladder should rise just in front of the cabinets, with rungs clearing the cabinet doors. I’ve found that if the ladder is too far forward, it crowds the fire extinguisher below; too far back, it blocks the cabinet. Find that sweet spot where it frames the tire rack and gives you a clean sightline to the bench.
The left wall is where you need precision. High and centered, mount the gray ventilation grille. Below it, stack three license plates vertically: “GR-S3,” “GR7E14,” and “LAMEIS,” in that order from top to bottom. To the right of the plates, mount the white first-aid box with the red cross. On the floor beneath, park the red fire extinguisher with a blue cap, hugging the corner near the ladder. Finally, roll out the red-and-blue striped floor mat at the bottom left. These pieces must interlock without touching the ladder. It’s like Tetris—each piece has one correct spot.
Build your work zone beneath the mezzanine. Slide the two-drawer wooden workbench against the back wall under the catwalk. Above it, hang the beige pegboard showing silhouettes of tools—wrench and pliers. Add three red pendant lights in a row under the catwalk lip. Set the small yellow-framed window to the right of the pegboard, just clearing the third lamp. On the bench surface, arrange two yellow bottles of oil at the left, then a tall spray can, a single red glove, and an open red toolbox with screwdrivers and wrenches. Keep the heights varied so the lamps read clearly. I always check that the window doesn’t collide with a pendant—if centered, it will, so nudge it right.
Populate the tire storage area. Behind the ladder and just left of the bench, place the horizontal metal tire rack loaded with dark tires. They should be stacked in a neat row, peeking out from behind the ladder. At floor level near the motorcycle’s front, place the small orange air tank—it’s a compressor. Add a thin framed print to the far left of the pegboard; it’s a pale technical poster. The tire rack should be visible but not blocking the ladder, and the compressor must sit forward enough to be seen but not clip the lift.
Center the scissor lift and park the motorcycle. Drop the red scissor lift platform squarely in the room’s middle, aligned with the floor tiles. Place the red motorcycle on top, oriented so the headlight faces the left-front corner. The leather saddle and chrome exhaust should be fully visible. I always ensure the front wheel doesn’t protrude past the lift’s leading edge. This motorcycle is the focal object—every other prop radiates from it. If the bike sits too far back, you’ll crowd the tool cart; too far forward, you’ll bump the tire stack.
Add greenery for balance. Set the second leafy potted plant on the floor between the bench’s right side and the garage door jamb. Its leaves should overlap the door trim slightly but not hide the door handle area. Up above, confirm the first plant remains on the catwalk’s far right end, inside the safety rail. This mirrored greenery softens the industrial palette and frames the window. Plants are surprisingly strict—move them too far, and you lose that triangle of interest formed by lamp, window, and leaves.
Arrange the tool cart and stool. Roll the red tool cart with a gray curved top to the right-front floor, just inside the door plane. Its blue wheels should sit diagonally, one barely visible. On the cart top, place the green spray can, a pair of red gloves, and an orange-handled wrench laid horizontally. Add the small beige stool just left of the cart, square to the floor grid. The cart and stool create a mini service station by the door. If the stool tucks too far under the lift, it feels lost—keep it independent.
Scatter the front-floor clutter last. At the very front edge, slightly left of center, stack two loose tires with a third leaning against them. A sealed tan cardboard box goes immediately to their right, tucked under the scissor lift’s front cross-brace shadow. This small mess should not block the stool’s pathway. These items complete the scene’s realism and help the eye travel from foreground to motorcycle. Many players misplace the box behind the lift; don’t—its tape top must be visible to echo the pale highlights on the helmet row above.
Conduct final checks. Zoom in and confirm three pendant lamps hang evenly over the bench. Check that the motorcycle’s headlight sits under their glow. Make sure no item overlaps the catwalk rail. Ensure the first-aid box doesn’t clip the ladder upright, the fire extinguisher touches the wall base, and the striped rug does not pass the room’s bevel edge. On the right, the small motorcycle frame should align with the top of the checkered-flag frame. These tiny adjustments are what the placement-puzzle is all about.
Features of Dreamy Room Level 328 Walkthrough
Dreamy Room Level 328 Walkthrough stands out because of its placement precision. The steel roll-up garage door is the primary anchor for the entire layout. It’s not just a door—it’s the reference point for every other element in the room. When I first tackled this level, I didn’t realize how essential that door was. I placed it casually, and everything else felt off. Once I centered it properly, about one tile above the floor line, the whole puzzle clicked. The door’s pale gold casing frames the right side, and its height dictates where your tool cart, stool, and wall frames will go. Get the door right, and you’ve solved half the puzzle.
Decorative elements play a huge role in this level. Racing art frames are strategically placed above the door to enhance the aesthetic without obstructing other features. The large frame with crossed checkered flags sits above and slightly left of the door’s top edge. The smaller frame showing a green motorcycle goes to its right. These frames add color and energy to the room, and they must stay on the same horizontal line. I like to think of them as the room’s personality—they tell you this is a racer’s space. But they’re also functional: if they overlap the doorway trim, your window plant cluster won’t balance right later.
Functional storage is another key feature. Mezzanine storage cabinets are designed to optimize space while showcasing thematic items like helmets and a riding jacket. The glass-front cabinet displays a yellow-and-blue padded riding jacket, and to its right, three open cubbies hold miscellaneous gear. On top, three helmets line up left-to-right: blue with a white wing accent, red, then teal with cat-ear styling. A leafy potted plant caps the run at the far right end. This setup isn’t just for show—it creates the overhead story and supports the catwalk you’ll add next. I’ve learned that getting these cabinets flush to the back corner is crucial; otherwise, the catwalk won’t sit right.
Safety and access features include a catwalk, safety rail, and wooden ladder. The short blue catwalk platform goes under those cabinets, with a pale yellow safety rail along its outer edge. The light-wood ladder leans against the left interior wall, landing on the catwalk’s left edge. The ladder should rise just in front of the cabinets, with rungs clearing the cabinet doors. This geometry matters because the ladder also frames the tire rack below and gives you a clean sightline to the bench. If the ladder is too far forward, it crowds the fire extinguisher; too far back, it blocks the cabinet. Find that sweet spot, and the whole left side comes alive.
An organized work zone is the heart of this level. A workbench, pegboard, and pendant lights create a functional area for tasks, with careful attention to arrangement for visibility. The two-drawer wooden workbench sits against the back wall under the catwalk. Above it, a beige pegboard shows tool silhouettes—wrench and pliers. Three red pendant lights hang in a row under the catwalk lip, casting a warm glow. The small yellow-framed window sits to the right of the pegboard, just clearing the third lamp. On the bench surface, two yellow oil bottles sit at the left, then a tall spray can, a single red glove, and an open red toolbox with screwdrivers and wrenches. I always keep the heights varied so the lamps read clearly—you want that warm glow to highlight your tools.
Realism in clutter adds authenticity. Loose tires and a cardboard box are placed last to enhance the scene’s authenticity without disrupting pathways. At the very front edge, slightly left of center, two loose tires stack with a third leaning against them. A sealed tan cardboard box goes immediately to their right, tucked under the scissor lift’s front cross-brace shadow. This small mess should not block the stool’s pathway. These items complete the scene’s realism and help your eye travel from foreground to motorcycle. Many players misplace the box
Similar Games
- Dreamy Room Level 219 Walkthrough
- Dreamy Room Level 172 Walkthrough
- Dreamy Room Level 327 Walkthrough
Final Words
Dreamy Room Level 328 tests your spatial reasoning through a densely packed motorcycle workshop that demands careful sequencing and pixel-perfect placement. Success hinges on establishing your framework early—anchor the roll-up door first, then build outward from that reference point. The mezzanine catwalk with its helmet display creates vertical interest, while the workbench zone beneath requires balancing pendant lights, pegboard tools, and the window without collisions. Your red motorcycle on the scissor lift serves as the room’s visual centerpiece, drawing the eye from the cluttered foreground of stacked tires and cardboard boxes.
The trickiest sections involve the left wall’s tight cluster—ladder, license plates, first-aid box, and fire extinguisher must interlock like Tetris pieces—and the tool cart area by the door, where diagonal wheel placement matters. Small details separate restarts from victories: ensuring plants mirror each other across the space, keeping the compressor visible near the lift’s front, and confirming no items overlap the catwalk rail. By following this systematic approach—walls first, catwalk assembly, work zone construction, motorcycle centering, then floor scatter—you’ll transform a jumbled inventory into a cohesive racer’s sanctuary and advance confidently toward Level 329’s next design puzzle.


