









Dreamy Room Level 332 demands precision placement and a keen eye for symmetry that has stumped thousands of players worldwide.
Can you beat Dreamy Room Level 332 without a guide? Technically yes, but most players report spending 20+ minutes repositioning objects. This walkthrough cuts that time to under five minutes.
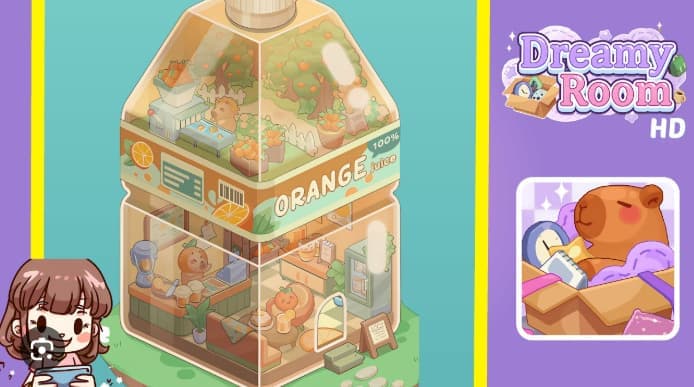
You’ve made it past 331 levels, so you know the drill: match objects to their silhouettes, create a cohesive scene, and watch your miniature world come alive. But Level 332 raises the stakes with its intricate orange-juice bottle design, where a single misplaced crate or rotated fridge can throw off your entire layout. The level packs an orchard, juice bar, cozy seating area, and storefront into a transparent bottle—and every piece must align perfectly with the vertical seam running down the center.
Why does this level matter? Because it sits in the 321-340 tier, where Dreamy Room tests your spatial reasoning and patience. Master this, and you’ll breeze through similar bottle-and-container levels ahead.
Key things you need to know about Dreamy Room Level 332:
- The bottle shell and cap must go first—they’re your alignment framework
- Platform differences exist: Android Level 332 may differ from iOS; always match by image, not number
- Six distinct zones require assembly: orchard, juicing station, bar counter, seating nook, pantry, and storefront
- Symmetry is non-negotiable: use the bottle’s center seam as your guide
- Common mistakes: swapping the blender with the register, placing the fridge backward, or crowding the central walkway
Dreamy Room Level 332 Walkthroughs & Guide
Dreamy Room Level 332 asks you to build an entire juice shop inside a clear plastic bottle—yes, you read that right! The scene mixes a sunny orchard with a cozy café, all tucked into that iconic container. You’ll place trees, workers, a counter, and even a fridge, then watch the magic unfold. The key is precision; every item must sit exactly where it belongs, or the whole picture falls apart. We start with the bottle shell itself: drop it dead center on the grassy base, making sure the white cap crowns the top.
That vertical seam running down the middle? Use it as your guide. Left and right panels should mirror each other in clutter and color. Once the shell locks in, you’ll fill the upper “attic” with orange trees, a wooden ladder, and a mint-green juicer that feeds a tiny conveyor.
Below, the ground floor hosts a bar counter on the left—complete with blender, cups, and a cheerful clerk—and a seating nook in the middle where a fruit-person relaxes on a peachy chair.
On the right, a fridge and sideboard finish the fresh-market vibe. Finally, add the rounded door, a citrus doormat, and an outdoor sign to welcome guests. The Dreamy Room Level 332 Walkthrough demands you think in layers: top to bottom, background to foreground, always checking symmetry.
If one piece feels “almost right,” it’s wrong. This level rewards players who zoom in, compare angles, and remember the story—from orchard to glass to happy customer.
How to Play Dreamy Room Level 332 Walkthrough
Playing this stage means building a miniature world inside a bottle. You’ll drag objects from your inventory and drop them onto the scene. Start by tapping the clear bottle shell; it anchors everything else. Position it so the flat base rests on grass and the cap sits centered at the peak.
Next, tackle the upper floor: place three orange trees in a row, a picket fence behind them, and a worker on a ladder reaching for fruit. Add the juicer on the left—hopper full of oranges, conveyor rolling—and drop crates of fruit in front. Now move to the lower-left corner. Drag the L-shaped counter into place, then add the blender, chopping board, and three takeaway cups along the front edge. Put the orange-headed clerk behind the counter, facing the register.
Hang the green menu board on the back wall. In the center, set a sectional sofa with an orange throw, a round coffee table, pancakes, and a glass of juice. Place the armchair to the right, angled toward the table.
On the lower-right, install the mint fridge against the wall, tuck a leafy plant beside it, and add the sideboard with a bowl of orange slices. Finally, center the rounded door, lay the citrus doormat, and position the outdoor steps and chalkboard sign.
The Dreamy Room Level 332 Walkthrough flows smoothly when you work top-down and left-to-right, locking big pieces first, then filling gaps with small props. Keep the central aisle clear so the scene breathes.
If an item won’t snap, rotate it or nudge nearby objects. Patience pays off—once every piece clicks, you’ll see the full juice-bar story come alive.
Features of Dreamy Room Level 332 Walkthrough
Perfect Symmetry Required
The bottle’s vertical seam divides the scene into left and right halves. You must balance clutter on both sides; if the left panel feels crowded, the right should too. Use the seam as a ruler to check distances.
Orchard-to-Glass Narrative
Three orange trees, a ladder, and a juicer tell the “fresh source” story. The conveyor feeds the counter below, where a blender turns fruit into drinks. This flow from harvest to service is a design gem in Dreamy Room Level 332.
Color-Coded Zones
Green dominates: counter fronts, fridge, steps, and sofa all share that mint hue. Orange accents—trees, throw blanket, clerk’s head—pop against the green. These color blocks guide your eye and help you spot mistakes fast.
Precision Over Speed
Unlike earlier levels, this one punishes “close enough.” The ladder must angle toward the tree, the blender sits strictly on the counter’s left, and the fridge must face forward so you see bottles through the glass. Even the “ORANGE 100% juice” label needs exact placement above the ground floor.
Character Placement Last
The fuzzy worker, the clerk, and the seated guest should go in after furniture locks. Drop them too early, and they’ll block your view or shift when you adjust other items.
Exterior Details Matter
The rounded door, citrus doormat, green steps, and chalkboard sign complete the façade. Players often forget the outdoor elements, but they’re scored just like indoor pieces.
Tips Built In
The game rewards players who build top-down, use color triangles as alignment guides, and perform mirror checks. Compare left and right clutter density; if one side looks sparse, you’ve missed something.
Step-by-Step Guide for Level 332
Step One: Anchor the Bottle Shell
Tap the clear plastic bottle and drag it to center stage. Its flat base should sit squarely on the grass. The white screw cap goes at the top; rotate until the oval highlights appear on the cap’s right side. Check the vertical seam—it must run straight down the middle, splitting the scene into equal panels. This shell frames every other object in Dreamy Room Level 332, so get it perfect before moving on.
Step Two: Build the Upper Orchard
Place three lush orange trees in the background, their round canopies dotted with fruit. Add the white picket fence behind them, zigzagging between shrubs. On the far right, set the wooden ladder angled toward the nearest tree. Drop the fuzzy worker beside or atop the ladder. On the left panel, install the mint juicer: hopper on top, boxy base, short conveyor with three oranges rolling. Place two big wooden crates overflowing with oranges—one near the center seam, another slightly right. Add the cheerful worker between conveyor and fence. This elevated zone completes the “fresh source” vibe.
Step Three: Assemble the Bar Counter
Move to the ground floor’s left side. Drag the L-shaped counter into place—orange-wood top, green front panels. At the far left, set the blue blender pitcher with orange slices inside. Next to it, add the chopping board with halved oranges and a small knife. Along the front edge, line up three clear takeaway cups with frothy tops. Behind the counter, position the orange-headed clerk facing right. Put the light-blue cash register on the inner corner. On the back wall, hang the framed green menu board and pin a small receipt note beside it. In front of the counter base, place a short potted plant in a white pot. This cluster anchors the service area.
Step Four: Create the Seating Nook
The middle of the scene mixes comfort with citrus. Place the sectional sofa on the left side of the central seam—green with a beige seat. Drape the orange-pattern throw blanket over the sofa’s upper edge so the citrus prints show. In front, put the round wooden coffee table. On the table’s left, add a tall stack of pancakes with syrup; on the right, place a clear glass of orange juice with a sliced wheel on the rim. Position the peachy-orange armchair to the right of the table, angled slightly left. Seat the smiling fruit-person on it. This snug vignette is the social heart of the level.
Step Five: Install the Pantry Zone
Shift to the right interior. Place the mint-green fridge against the right wall; rotate until the glass door shows stacked bottles and cartons. To the left of the fridge, tuck a broad leafy plant so its leaves frame the doorway area. In front of the back wall, add the beige sideboard with two drawers. On it, place a large glass bowl filled with orange slices and a recipe clipboard on a wooden stand. Slightly above, hang a small “Orange” tag sign under the bottle’s label band. Make sure the under-counter prep area lines up under the “ORANGE 100% juice” label that wraps the bottle’s midsection.
Step Six: Finish the Storefront
Center the rounded white-trim doorway on the lower-right panel. Insert the half-circle citrus-slice doormat so its wedges radiate toward the room. Outside, place two small green steps leading down to the grass. To the right of the steps, set a wooden A-frame chalkboard reading “TODAY,” angled slightly outward. Ensure a trio of pale stepping stones rests on the grass near the sign. Finally, wrap the bottle’s label—a mint-green band with oranges, barcode, and the words “ORANGE 100% juice”—aligned so “ORANGE” arcs above the seating area. Add soft white highlight streaks on the bottle walls; they’re visual cues, not objects, but they confirm correct placement.
Similar Games
- Dreamy Room Level 206 Walkthrough
- Dreamy Room Level 74 Walkthrough
- Dreamy Room Level 328 Walkthrough
Final Words
You’ve now mastered every angle, placement, and color-coded zone that makes Dreamy Room Level 332 both challenging and rewarding. This juice-bottle puzzle demands more than casual tapping—it requires spatial thinking, symmetry awareness, and a storyteller’s eye to transform scattered objects into a living miniature world.
From anchoring the transparent shell and balancing orchard crates to perfecting the fridge rotation and clearing that central walkway, each step builds on the last.
The green-and-orange color triangle, the harvest-to-service narrative, and the mirror-check technique aren’t just tricks—they’re the design language the developers baked into this stage. Whether you followed our step-by-step guide, applied the top-down building strategy, or learned from common pitfalls like misplaced A-frame signs and opaque fridge doors, you now hold the keys to a five-minute clear instead of a frustrating half-hour struggle.
Remember: precision beats speed, characters go last, and that vertical seam is your best friend. Armed with these insights, you’re ready to tackle similar container-based levels ahead and prove that patience and planning always win. Happy building, and watch your miniature juice empire come alive!


