








Dreamy Room Level 339 can be completed successfully — and this guide breaks down every placement step to help you build that adorable seaside micro-room scene without frustration.
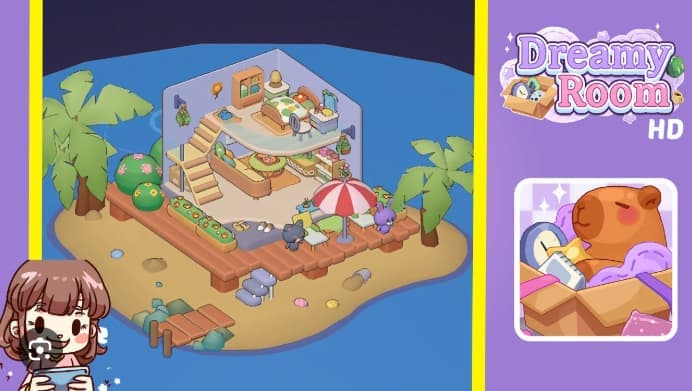
Dreamy Room Level 339 challenges players to assemble a charming glass-walled beach house perched on a wooden platform, surrounded by palm trees, loungers, and tiny coastal details. Many players struggle with this level because the transparent micro-room and multi-layer interior require precise alignment, and even small placement errors can throw off the entire composition. Whether you’re confused about where the platform goes, how to arrange the interior furniture, or how to position the outdoor characters and props, this Dreamy Room Level 339 Walkthrough will walk you through each object step-by-step.
Why This Level Matters
Level 339 sits in the mid-300s range where Dreamy Room ramps up complexity. You’ll juggle:
- Multi-level interior design – bed upstairs, sofa and table downstairs, plus stairs connecting them
- Outdoor landscaping – planters, palm trees, umbrella, and two character figures
- Beach details – shells, rocks, a broken dock, and sand textures
- Platform numbering quirks – Android and iOS versions may label levels differently, so always cross-check images
Getting Dreamy Room Level 339 right teaches you layering, perspective alignment, and attention to micro-props — skills that carry forward into later levels. Plus, the finished scene is one of the most charming dioramas in the game, rewarding your patience with a postcard-perfect tropical vignette.
Ready to place that platform and bring your island retreat to life? Let’s get started with Step 1 below.
Dreamy Room Level 339 Walkthroughs & Guide
To complete Dreamy Room Level 339, start by placing the large wooden platform centrally on the sandy island. The platform must align with three shallow holes and a shell cluster visible in the sand below. In Dreamy Room Level 339, this foundational piece anchors every other object, so we need to slow down and get it right from the start. Position the platform so its longest edge runs left-to-right, parallel to your camera view—this creates the proper perspective that makes the scene feel balanced and natural.
Once the platform sits correctly, add the glass-walled micro-room at the back center of your deck. The transparent walls let you see inside, so alignment matters; if the glass edges don’t match the platform boards beneath, furniture will appear to float. In Dreamy Room Level 339, the micro-room sits slightly right-of-center, leaving generous front deck space for outdoor loungers and an umbrella. Make sure a narrow strip of decking remains visible behind the micro-room’s base—this layering trick adds depth and realism to the composition.
Now furnish the interior: place a bed with a green polka-dot duvet on the upper level, back-right corner. Add a small lamp and vanity beside the bed, then position shelving along the back wall. On the lower main floor, center a curved sofa facing the camera, with a round coffee table in front holding a tiny fruit bowl. Install wooden stairs on the left interior edge to connect both levels; the stairs should overhang slightly toward the platform edge so they read as a continuous ramp. Finish by adding a wall lamp near the stairs and a hanging plant near the right wall.
Step outside and build the island’s greenery. On the left front of the platform, place a long planter with three orange-flowered boxes flush along the front-left boards. Behind the planter, add rounded green bushes, then position a tall palm tree close to the platform’s left corner. The palm trunk sits in a shallow sand hole, and fronds should angle outward to frame the micro-room. These plants anchor the left side and balance the umbrella group on the right.
Decorate the right-front deck area next: place a red-and-white striped umbrella near the platform’s right-front corner, with its pole just behind the second front deck plank. Put two small white loungers beneath the umbrella—one slightly nearer the center, the other to the right. Add a gray cat character near the center lounger and a purple rabbit near the far right edge; both should face inward to create a friendly, conversational grouping. Proper spacing here makes the scene feel lively, not cluttered.
Bring attention to the shoreline details that sell the seaside setting. On the sand down-left, add a broken mini-dock: two upright posts near the waterline and a short plank assembly leading into the sea. Scatter rounded rocks and a tiny green seaweed cluster adjacent to the dock. On the main sand in front of the platform, place three small shells—pink, yellow, and blue—in a gentle arc, plus two shallow footprints or holes nearer the planter row. These small objects add texture and make Dreamy Room Level 339 feel authentic and lived-in.
Finish with micro details: place yellow flip-flops on the inside floor near the micro-room entrance, and hang a small towel or bag from exterior wall hooks on either side of the glass room. On the platform edge near the planter, add a tiny stack—maybe a basket or rolled towels—and under the platform add small cylindrical supports visible in the reference image. Attach a wall-mounted lamp near the right exterior wall and place a hanging plant on the left exterior hook. These accents are subtle, but they’re what players notice when placements are exact.
How to Play Dreamy Room Level 339
Playing Dreamy Room Level 339 requires a methodical, layer-by-layer approach to object placement. We start with the largest structure—the wooden platform—and work our way down to the smallest props like shells and flip-flops.
This layered method reduces the need for repositioning and helps maintain visual coherence throughout the build. Think of it like painting: you block in the big shapes first, then add details once the composition is locked.
Step 1: Lay the Foundation
Begin by selecting the large wooden platform from your object menu. Drag it onto the sandy island and rotate it so the longest side runs left-to-right. The platform should sit above the three shallow holes and the cluster of shells visible in the sand—this alignment leaves room for the dock on the lower-left and the umbrella group on the lower-right.
Make sure the support posts are snug against the sand, with evenly spaced posts visible underneath. A slight rotation toward camera-left mirrors the reference image and anchors every later object.
Step 2: Install the Micro-Room
Select the glass-walled micro-room and place it at the back center of your platform. The transparent box has a low wall wrapping a two-level interior; position it slightly right-of-center so a generous front deck remains for outdoor furniture.
Align the glass edges with the platform boards beneath—misalignment makes interior furniture appear to float or clip through walls. Keep the micro-room slightly inset from the platform’s back edge so a narrow strip of decking stays visible behind its base.
Step 3: Furnish the Interior
Now populate the micro-room. On the upper level (back-right), place the bed with a green-and-white polka-dot duvet; the headboard should touch the right wall. Add a lamp and tiny vanity to the bed’s immediate right, then place shelving and a wall-mounted cabinet to the left along the back wall.
On the lower main floor, center a curved sofa facing the camera, with a round coffee table (holding a fruit bowl) in front. Position the staircase on the left interior edge so it connects the lower living area to the upper bed; the stairs should overhang slightly toward the platform edge. Finish by adding a wall lamp near the stairs and a hanging plant near the right interior wall.
Step 4: Add Outdoor Greenery
Return outside and build the left side’s greenery. Place a long rectangular planter with three orange-flowered boxes flush along the front-left platform boards. Behind the planter, add rounded green flowering bushes, then position a tall palm tree close to the platform’s left corner. The palm trunk sits in a shallow sand hole, and fronds should angle outward to frame the micro-room. Make sure the bush cluster slightly overlaps the platform edge so it reads integrated, not pasted on.
Step 5: Decorate the Right Deck
Place a red-and-white striped umbrella close to the platform’s right-front corner; its pole should sit just behind the second front deck plank. Put two small white loungers beneath the umbrella—one slightly nearer the center, the other to the right. Add the gray cat character near the center lounger and the purple rabbit near the far right edge; both should face inward. Tuck a small round side table or potted plant beside the loungers if available.
Step 6: Build Shoreline Details
On the sand down-left, add the broken mini-dock: two upright posts near the waterline and a short plank assembly leading into the sea. Scatter rounded rocks and a tiny green seaweed cluster adjacent to the dock. On the main sand in front of the platform, place three small colorful shells (pink, yellow, blue) in a gentle arc, and add two shallow footprints or holes nearer the planter row.
Step 7: Add Small Extras
Place yellow flip-flops on the inside floor near the micro-room entrance. Hang a small towel or bag from exterior wall hooks on either side of the glass room. On the platform edge near the planter, add a tiny decorative stack (basket or rolled towels). Under the platform, add small cylindrical supports. Attach a wall-mounted lamp near the right exterior wall and place a hanging plant on the left exterior hook.
Step 8: Final Alignment Pass
Do a full pass checking alignment and lighting. Rotate the entire micro-room and platform slightly if elements seem off-axis. Nudge the umbrella and planter row so they don’t overlap awkwardly with palm fronds. Check shadows and make sure support posts align with sand indentations. Zoom out and compare proportions: the bed should be visible through glass, both characters clearly readable, and the dock and shells should balance the lower-left.
Features of Dreamy Room Level 339
The Dreamy Room Level 339 Walkthrough emphasizes placement precision, layered construction, and attention to micro details. These features work together to help you re-create a cohesive, charming seaside micro-room scene that matches the reference image. Below, we break down the key features that make this guide effective and easy to follow.
Importance of Placement Precision
Accurate alignment of objects is crucial in this level. Tiny misalignments—especially of the glass room, platform, or umbrella—break the composition and make the scene feel disjointed. Always keep the platform as your reference anchor. If later objects look wrong, reset to the platform placement used in Step 1 and re-nudge from there. The platform’s position determines where every other object sits, so getting it right early saves time and frustration later.
| Object | Alignment Tip |
|---|---|
| Platform | Align longest side left-to-right; sit above three holes and shell cluster |
| Micro-room | Glass edges flush with platform boards; slightly right-of-center |
| Umbrella | Pole behind second front deck plank; base embedded in board |
| Palm tree | Trunk in shallow sand hole; fronds angle outward to frame scene |
Step-by-Step Guidance
The guide provides detailed instructions for each step, starting from laying the foundational platform and progressing to adding final decorative touches. Each step is numbered sequentially and includes a bold header that summarizes the action concisely. Detailed paragraphs then expand on placement, alignment, and spatial relationships. This structure mirrors the way experienced players naturally approach complex levels: big pieces first, then medium props, then tiny accents.
Interior and Exterior Design
Emphasis on both the micro-room’s interior furnishings and the outdoor landscaping creates a cohesive scene. Inside, you arrange a bed, sofa, table, shelving, lamp, and stairs to form a functional two-level living space. Outside, you add planters, bushes, a palm tree, umbrella, loungers, characters, dock, rocks, and shells. Balancing interior and exterior elements is what makes the scene feel complete and lived-in, not just a random collection of props.
Layered Approach
The recommended method is to work in layers: place the platform and micro-room first, then block in large furniture, then add props, then finish with tiny decor. This approach reduces repositioning because each layer depends on the one before it. For example, you can’t accurately place the umbrella until the platform is locked, and you can’t add flip-flops until the micro-room interior is furnished. Layering also helps you spot misalignments early, before they cascade into bigger problems.
Visual Alignment Techniques
Use mirrors or camera overlays (if available in your version of the game) to line up planters, umbrella, and palm fronds. Aligning with visual guides speeds matching the reference and reduces guesswork. When a prop seems slightly off, try slight vertical lifts (0.5–1 unit) before rotation; often vertical offset resolves perceived misplacement without reworking positions. Group related pieces—like the two loungers, umbrella, and characters—and move them as a unit for faster fine-tuning.
Final Adjustments
A thorough review process ensures all elements align correctly and enhance the overall aesthetic. Zoom out and view the scene at the same zoom level as the reference image—details look different close-up versus full composition. Check shadows, make sure support posts align with sand indentations, and confirm that no objects clip or float. This careful final adjustment is what distinguishes a close re-creation from a rough layout.
Similar Games
- Dreamy Room Level 200 Walkthrough
- Dreamy Room Level 289 Walkthrough
- Dreamy Room Level 272 Walkthrough
Final Words
Dreamy Room Level 339 rewards patience with one of the game’s most picturesque tropical scenes. By following this placement-by-placement approach—starting with the wooden platform foundation, layering in the glass micro-room, then adding interior furnishings, outdoor greenery, and shoreline accents—you’ve transformed scattered objects into a cohesive seaside retreat. The key lies in treating each step as a building block: lock the platform position first, align the transparent walls precisely with deck boards, furnish both interior levels before moving outside, and balance left-side palm trees with right-side loungers and umbrella. Those tiny details—flip-flops on the floor, shells in the sand, the broken dock, and hanging plants—breathe life into the composition and separate a polished re-creation from a rough draft.
What sets Level 339 apart is its demand for spatial awareness across multiple planes: you’re juggling vertical layers inside the micro-room, horizontal balance across the deck, and depth cues from sand to platform to glass walls. Master these alignment skills here, and you’ll breeze through later mid-300s challenges that throw even more transparent structures and multi-level interiors your way. Take your time with the final alignment pass—rotate, nudge, and zoom out to match proportions against the reference image.
When every element clicks into place, you’ll have crafted a miniature vacation postcard that captures the charm and challenge that make Dreamy Room so satisfying.


