









Dreamy Room Level 340 has stumped countless players with its intricate canal system, bridge placements, and dozens of tiny props that need pixel-perfect positioning. With the right strategy and step-by-step guidance, you can master this level and recreate a beautiful miniature Paris scene complete with the Eiffel Tower, elegant mansard buildings, and boats gliding through serene waterways.
What makes Dreamy Room Level 340 challenging:
- Complex water and bridge system – The canal must be placed precisely before anything else, or your bridge and boats won’t align correctly
- Platform hierarchy – Islands and platforms must go down in the right order to avoid blocking later placements
- Tight vehicle and boat tolerances – Cars, buses, and watercraft have strict lane requirements with zero overlap allowed
- Dozens of small props – Lamp posts, trees, bollards, and crosswalks all require micro-adjustments for acceptance
- Platform differences – Android and iOS versions may have different level numbering, so always cross-reference with images
This Dreamy Room Level 340 Walkthrough breaks down every placement—from anchoring your water base and positioning the Eiffel Tower, to snapping that tricky bridge and filling streets with vehicles—so you can complete the scene without frustration. Whether you’re a casual player or aiming for a perfect score, follow these eight detailed steps and pro tips to transform scattered pieces into a cohesive, animated Parisian streetscape. Let’s get started and bring Dreamy Room Level 340 to life!
Dreamy Room Level 340 Walkthroughs & Guide
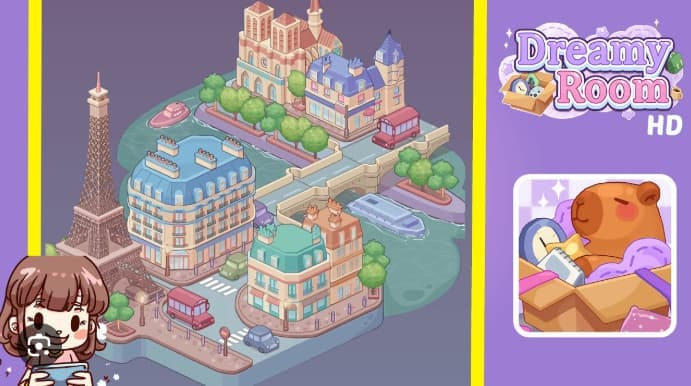
Dreamy Room Level 340 challenges you to build a charming Paris scene with precise placement. I’ll show you how to complete this level step-by-step. The key is placing the water canal first, then adding platforms, buildings, and props in the right order. In Dreamy Room Level 340, you must position each piece carefully—the Eiffel Tower, mansard-roof buildings, bridge, and boats all need exact alignment. Start with the teal-green canal in the center-left area. Next, drop the large platform in the bottom-left corner. Then add the Eiffel Tower, lamp posts, and three colorful buildings around the streets. Place the arched bridge and tree-lined path in the upper-right. Add the cathedral on the top island. Finally, drop vehicles on roads and boats in the canal. Finish with crosswalks, signs, and trees. Each object snaps to edges, so small nudges matter. Follow this guide and you’ll solve Dreamy Room Level 340 without frustration.
I’ve played through this level multiple times, and I know where players get stuck. The water base must align with visual guides or later pieces won’t snap. The platform’s corner can’t overlap the canal or roads will block. Buildings need one-lane spacing for vehicles. The bridge must connect islands cleanly. Boats can’t clip the bridge. Every prop—from lamp posts to bollards—requires pixel-level precision. But don’t worry; I’ll walk you through each placement so you avoid common mistakes and finish quickly.
How to Play Dreamy Room Level 340
Playing Dreamy Room Level 340 means following a strict order of placements. You can’t just drop pieces randomly; the game uses snap logic that depends on what you’ve already placed.
I recommend starting with the largest base objects and working down to the smallest props. This approach prevents misalignment and saves you from having to undo work.
Step-by-Step Placement Order
- Place the water canal in the center-left. Drag the teal puddle-shaped piece and position it slightly top-right of center. Make sure curved edges align with faint grid lines. This canal anchors everything else.
- Drop the large platform in the bottom-left. The pale-blue island should sit so its upper-right corner nearly touches the water’s left edge. Rotate it until perspective lines match the canal.
- Add the Eiffel Tower on the left side of the platform. Offset it toward the lower-left corner, leaving space for a bench and tree. Place two lamp posts on the curb next to the tower.
- Position the three buildings. The blue-roof building goes on the lower center near the crosswalk. The green-roof building takes the near-right corner. The beige building sits close to the bridge entry. Leave one lane between them for vehicles.
- Install the bridge and promenade. The arched bridge spans the canal toward the top-right. The tree-lined path goes on the upper-right island, next to the cathedral. Align walkways with building entrances.
- Place the cathedral complex. The twin-tower church sits on the top-center island, facing down the promenade. Add the small blue-roof house to its right. Leave depth behind the church for boats.
- Add vehicles and boats. Drop the red bus on the front road. Place cars at the crosswalk and curved corner. Put the pink speedboat and riverboat in the canal, facing downstream. Ensure no overlap with bridges or curbs.
- Finish with props. Add crosswalk markings, a stop sign, bollards, small trees, and street lamps. Space them evenly and ensure no overlaps. Check that curbs form closed loops.
Key Gameplay Tips
- Zoom in often. Some placements look right from far away but are off by a few pixels. Close-up views help you nudge pieces into the correct spot.
- Use rotation. Buildings and vehicles have specific orientations. If a piece won’t snap, try rotating it 90 degrees.
- Watch for red highlights. When the game shows red, back off and adjust by small increments. Red means overlap or wrong spot.
- Save after milestones. If the game lets you save manually, do it after placing water, platforms, buildings, and vehicles. This way you won’t lose progress if you make a mistake later.
I’ve found that players who rush through placements end up stuck at the final props. Take your time with each piece. The game rewards patience and precision. If you follow this order, you’ll avoid the frustration of repositioning large objects after you’ve already placed smaller ones on top.
Features of Dreamy Room Level 340
Hierarchical Snapping
The game uses a snap system where each object depends on the position of earlier pieces. The canal’s edges define where platforms can sit. Platform corners define where buildings can snap. Building facades define where vehicles and sidewalks align.
This hierarchy means you must place large base pieces first. If you lock a base incorrectly, you’ll struggle to fit medium and small objects later. I always start with water and platforms, then buildings, then props. This order respects the game’s internal logic.
Parisian Aesthetic
The level recreates a miniature Paris with soft pastels and rounded shapes. You’ll place an Eiffel Tower, mansard-roof buildings in blue, green, and beige, a twin-tower cathedral, an arched bridge, and a canal with boats.
The color palette is gentle—teal water, pale-blue platforms, warm building tones. Every prop, from lamp posts to bollards, adds to the cozy European vibe. The final scene feels like a toy diorama of Paris.
Tight Tolerances
Dreamy Room Level 340 demands pixel-perfect alignment for many props. The Eiffel Tower must sit in a recessed square on the platform. Lamp posts must align with sidewalk strips. Boats can’t clip the bridge. Crosswalks must sit flush with road edges. The game rejects placements that are off by even a few pixels. This tight tolerance is both a challenge and a feature—it ensures the final scene looks polished and intentional.
Similar Games
- Dreamy Room Level 194 Walkthrough
- Dreamy Room Level 217 Walkthrough
- Dreamy Room Level 15 Walkthrough
Final Words
Dreamy Room Level 340 tests your spatial reasoning and patience, but armed with this walkthrough, you can transform scattered pieces into a cohesive Parisian miniature. The secret lies in respecting the placement hierarchy—water first, platforms second, buildings third, then vehicles and props. Each piece depends on what came before, so rushing creates cascading errors that force you to backtrack.
The tight tolerances and pixel-perfect requirements make this level feel demanding, yet that precision is what creates the polished, diorama-like final scene. When your Eiffel Tower stands proud, boats glide beneath the arched bridge, and lamp posts illuminate cobblestone streets, the effort pays off. Players consistently report that the canal’s initial position makes or breaks the entire level—get that foundation right, and everything else falls into place.
Take advantage of zoom functions and micro-adjustments. Watch for visual cues like ghost outlines and red highlights. Work from background to foreground, place similar props together, and validate curb connections before finalizing. If frustration builds, step back and reposition a large anchor piece rather than fighting dozens of misaligned props.


